RSS Feed
I'm back! Fellow crafters, my apologies for not creating more posts on crafts, it's the holidays you know.
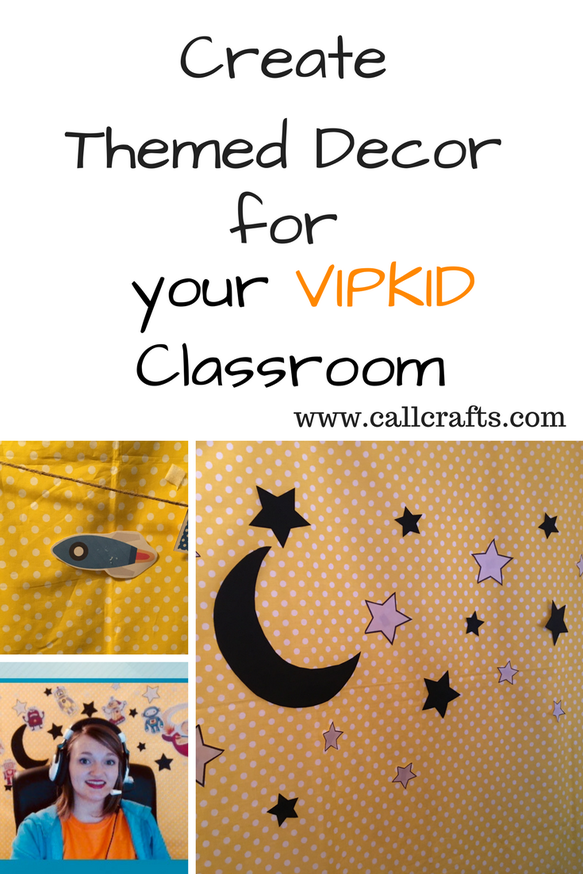
Anyways, onto the post, VIPKID teachers! This was the second theme I created for my classroom, the Cloud Background was the first (feel free to check it out). Out of all the ones I've created, this one is probably the one that gets used the most. I guess it's my favorite... I don't know. I love the Halloween background I created and the one for the Chinese Mid Autumn Festival. Feel free to check those out too.
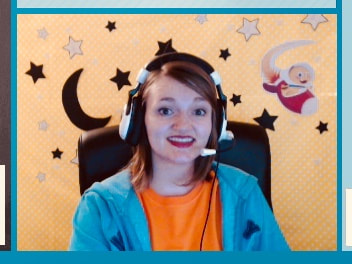
Making the background itself is very simple. It's just a bunch of stars and a moon I cut free hand from black and white paper. I added the rocket Dino later on when I found him on Facebook (thanks again for sharing, fellow teachers!). They all stick up with tape.
Obviously, I couldn't use yellow stars in a yellow fabric, so I though black stars would be a fun contrast, and I was totally right! The white stars you see came to be on accident. I was printing out the stars on black paper and accidentally ordered two copies instead of just one. Oh well, might as well use them. Turns out they're a fun addition to the background as well. So I've kept them. (Want your own starry sky? Get the printable below!) 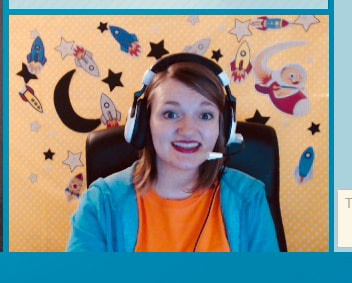
I place the stars in a different spot every time. I use the loop Velcro stuck onto my fabric as a marker for where the stars should go. That way, all the stars are shown on the camera and they fill the background nicely. And these I stick up with tape. I don't move them during my classes, so I haven't had any issues with them falling off. If it ever happens, then I just replace the tape when I finish classes.
The photo you see above is one of the rewards I only use with this theme: rockets. This is how I add variety to my classroom and make sure I don't use the same rewards over and over again. Sometimes I cheat and use the rockets if I feel like the kid will really enjoy it for another theme. But usually, they only appear when I put up this theme. Here are some other rewards I've made:
Aliens
Robots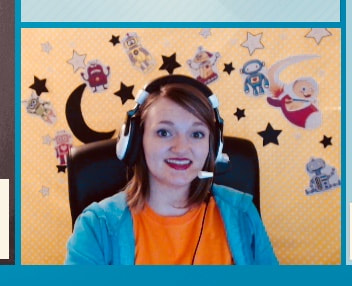
I also have one for Shooting Stars as well for the girls. Right now I'm kicking myself for not taking a screen shot of this reward. I'll share a photo of it on my Facebook Page so you can see what it's like later on.
Here's the link for the stars printable. Click on the title to download it: (Note: here's what I originally made this template for) 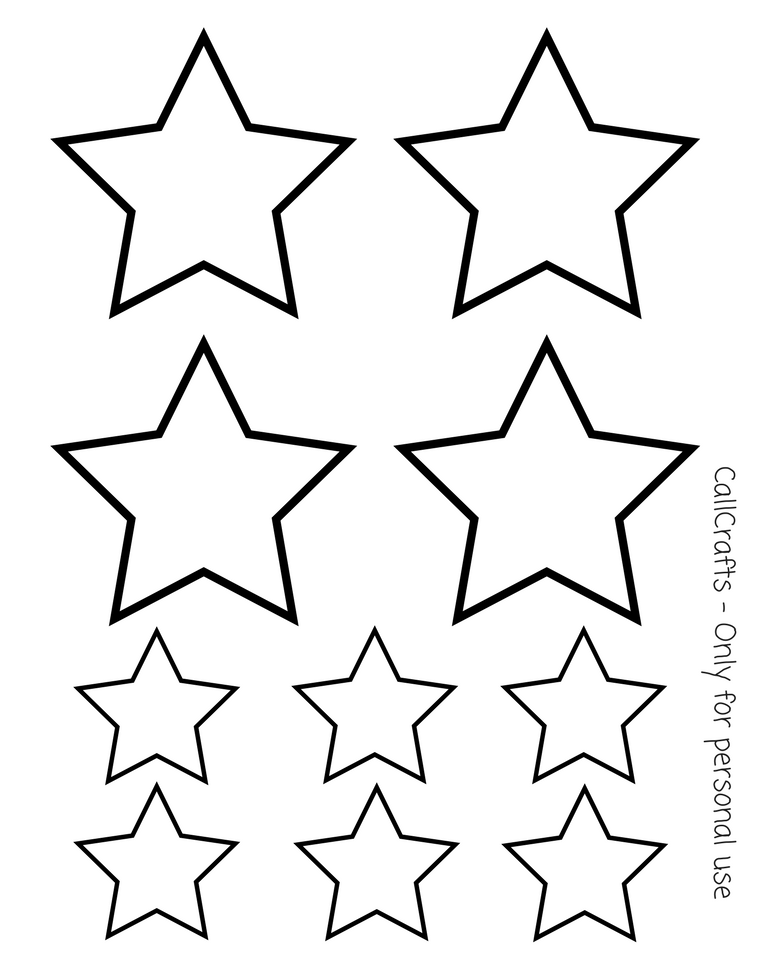
Stars Template
Thanks for reading. If you are interested in getting a copy of the rewards you saw today, Contact Me. See you next time!
P.S. If you think this will be a fun job to join, I’d love to help you through the interview process. You can email me with the mail icon below for any questions. My referral code (for when you apply) is: 04A7J3
0 Comments

This week's VIPKID post is about how I use Velcro in my classroom. I'm fairly new, so I've been partially making up my own way of creating a classroom, and then borrowing things from other people, especially with rewards. One trend I've been noticing is that people use baking sheets to hold up rewards they give in their classroom. If you've read my previous posts, you've seen that there is NO WAY I can use a baking sheet. There's my husband's desk, which has my props, and then the PVC Pipe Stand behind my chair. The only thing my students can see is me and my PVC pipe stand-made background behind me. There's no where to prop one of those up.
Those are great rewards for brand new students or little 5 to 7 year olds, but what about the older kids? Those rewards are BORING. I have loved how we share with each other, it's so great. I hope this is making a great contribution. It's my way of giving back.
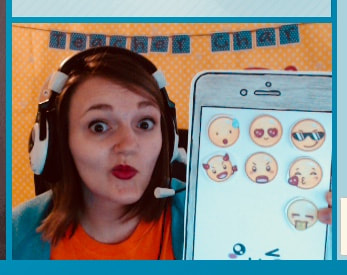
I've read how teachers give their students emojis and stick it onto a phone. Or how they play the game, "Find the Star." I have a few students who LOVE that game. Dress Dino has also been a hit with my kids too. However, most people I know use a cookie sheet to help display this reward. Well, here's how I've overcome that problem for my classroom. Emoji/Phone Reward
Let's start with this one. It'll lay the foundation for the rest of rewards I use. What I've done to display the reward is that I've placed a piece of adhesive hook velcro onto the back of my phone. Like this:
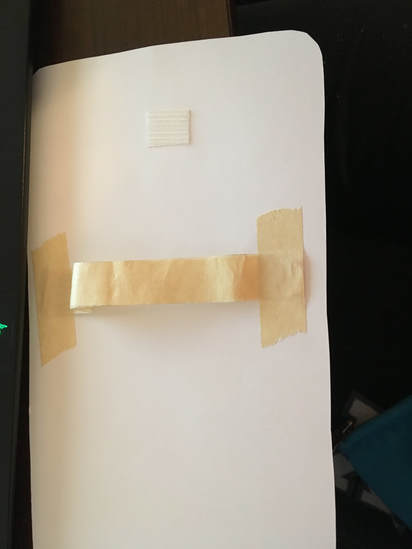
I also made my own handle out of tape on the back to make it so I can hold onto the phone without having my fingers in the way when I bring the reward up close to the screen (I hardly use it though). At the beginning of class and when I'm not using the reward, I'll fasten it on a piece of loop velcro on the fabric behind me. When I'm using the reward, I'll unfasten it from the fabric and bring it up close to the camera so the students can see the details better.
So that's all fine and dandy, but how do you stick the reward onto the phone over and over again? Tape? That's what I used to do. However, I found that over time, the tape would lose it's stick. Or even worse, it would rip off some of the paper from another reward. I have several rewards that just look awful because the tape has ripped some of the image off. But I guess you have to live and learn.
So my friends, I've decided to use Sticky Tack! I've had this stuff since I first went to college almost ten years ago and it's still going! It's pretty easy to take on and off, it doesn't lose it's stick as easily, and it won't ruin your other rewards. 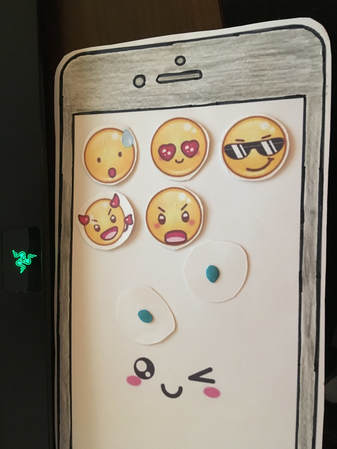
Pretty easy, and very effective.
I use this same concept when I put my "Find the Star" reward together. I cover my "Find the Star" sheet with a sheet protector. Then I cover each image with a numbered square, stuck on with sticky tack, and hang it in the back just like this phone. Easy!
Dress Dino
I love when I get the kids who pick all the crazy items, like the clown hat and the pirate's cap. So fun! As you can see, same principle, Dino has a piece of adhesive hook velcro on the back and it's fastened to a loop piece on my fabric.
All of the costume items have a piece of sticky tack and I simply place it on Dino during the lesson. Because I haven't laminated Dino, he now has some nice blue spots where I usually put the sticky tack (oops, didn't see that one coming). 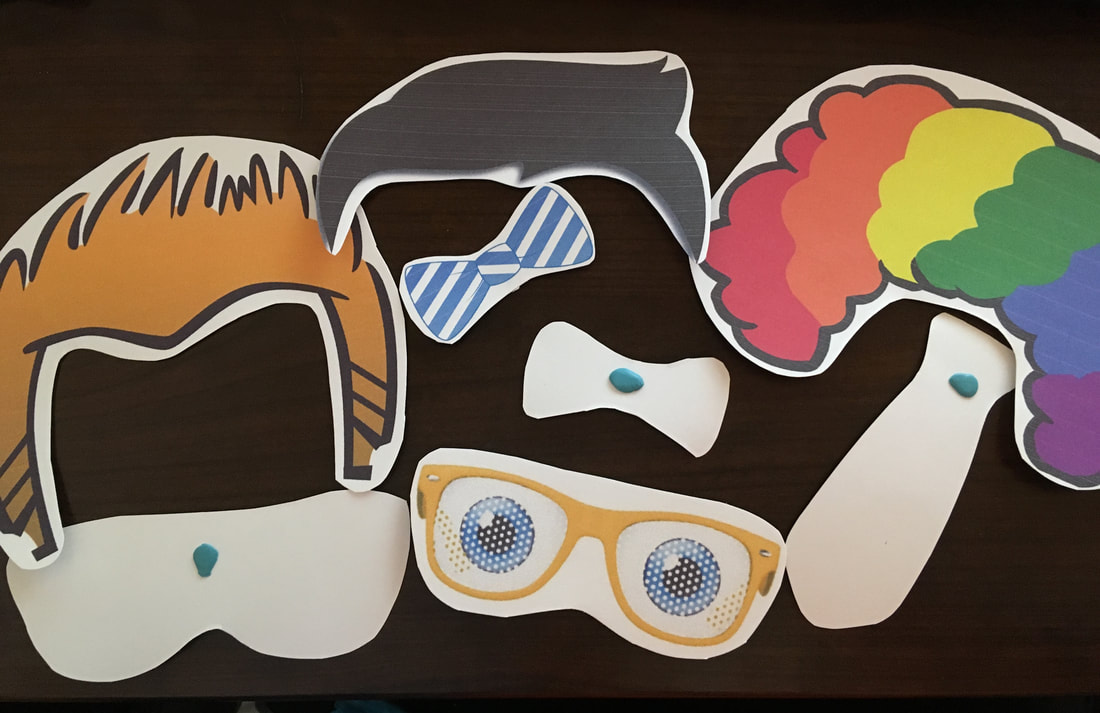
Here's something to keep in mind. Most of the time, one piece of tack will work. But if the item is pretty big, like the clown wig, you'll need an additional piece. I've had the wig fall off on me a few times during a lesson... I normally play it off, but it wastes time having to pick it back up and put it back on.
We dress Dino after I've award a star, it gives them a little break. So with 5 stars, we put on 5 pieces. We start with the smaller pieces (sunglasses, tie, etc.) and save the big ones for last. They don't have as much time to fall off that way. Now, here's a teaching technique I'm going to share. Right now, I mostly teach Level 2 and a few Level 3 students. With their limited English, they don't know the word "dress" yet. So this image you see below is what the kid would see at the beginning of class (except I'm waving hi): 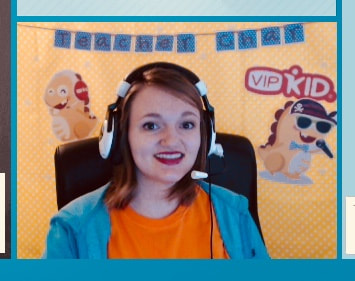
Then when I tell them what they get to do today, I unfasten Dino from my fabric and bring him up to the screen saying, "You get to dress Dino!" And they see Dino in his costume and think, "Oh, that's cool. Dino looks funny." But then, I take off the pieces and that's when they understand, "Oh! We're putting stuff on him! That's cool." I've seen several light bulb moments happen when I've done it this way. Then they're excited for the reward.
Recently, my technique is that we "build" the background with the rewards. The background starts with just the base decor and is built from there. In this case, you see the end from the beginning. I also use this technique with my Emoji/Phone reward as well, but I usually just have one on there from the beginning and keep it up there for the entire class. Well, that's it, folks! That's my classroom set-up. As I've stated before, I don't know if this has affected my ratings. I haven't had a parent comment on my background in the feedback. I have had parents say that the class has a fun atmosphere, and I feel how I've made my classroom background look and function has something to do with it. But like I've heard from someone on Facebook about bookings, "personality and talent win through in the end." I think that's very true. We're all our own individuals. If this is something that interests you and would like to read more posts, subscribe to my email list below. Or like my Facebook or Pinterest page (the links are also below). I generally post a new VIPKID-related craft once a week. Next week, I'll be sharing my Starry Sky theme and rewards I've created for this theme. See you then!
P.S. If you think this will be a fun job to join, I’d love to help you through the interview process. You can email me with the mail icon below for any questions. My referral code (for when you apply) is: 04A7J3
Want more tricks? Check out my new post: My VIPKID Classroom Upgrade. You'll love it!
Happy Halloween everyone! What a fun time of year. All the decorating, treats, parties. It's so great! I've heard about VIPKID teachers dressing up for their students on Halloween, which sound so fun! I decided to add my own fun to my classroom by creating a special background for the holiday.
Ta-da!! I actually tried it out today for my classes, and I LOVED it. If you look at the moon, it's the same one I used for my Mid Autumn Festival background. The bats were from another project I've done recently. If you go to DIY Decor: Halloween (Part 2), you'll find the link to the site where I got these specific bats from. You can also google bat template as well if that's easier for you.
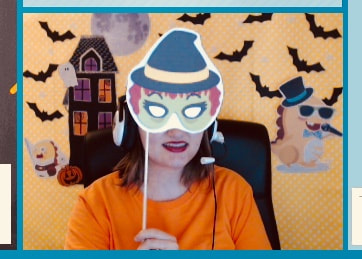
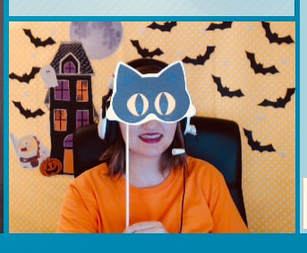
In addition to this fun background, I also found a couple of masks from a Holiday Incentives PDF file someone shared with a ton of holiday rewards on them. So what I plan on doing with my regulars is surprise them by wearing these masks right when I open the screen.
Yea, I know, I probably should cut out the holes for the eyes. I'll get to it later. But it's a fun little thing I've added. I like good surprises, and I like giving good surprises.
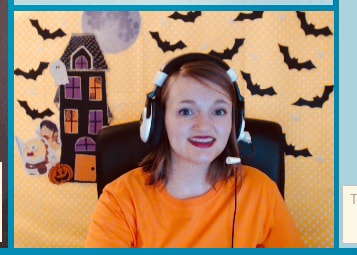
In the photo on the left, you see my Dress Dino reward. What I do at the beginning of class is I put a few things on Dino, then I bring Dino up to the screen and take off the items. That way if a student doesn't know what "to dress" means, I've demonstrated it at the beginning of the lesson. So far, its been successful with my older students (thank again for sharing friends!). This Dino is sticking onto the fabric using velcro. Next week, I'm going to show you all my tricks with velcro. If you're like me and don't have somewhere to place your cookie sheet for the student to see, or if you're finding that magnets are expensive, this is a great post! Below is another reward I used today in my classroom, all hung up with velcro. 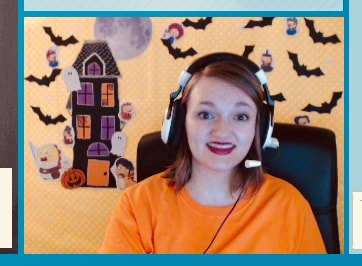
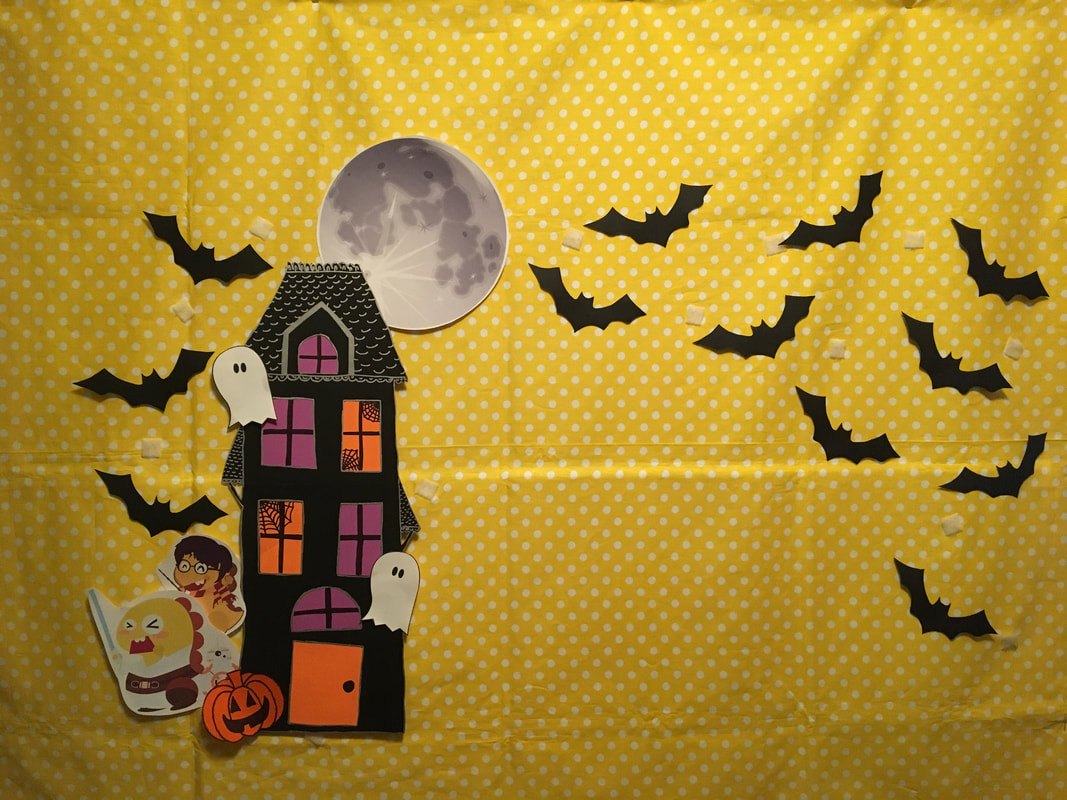
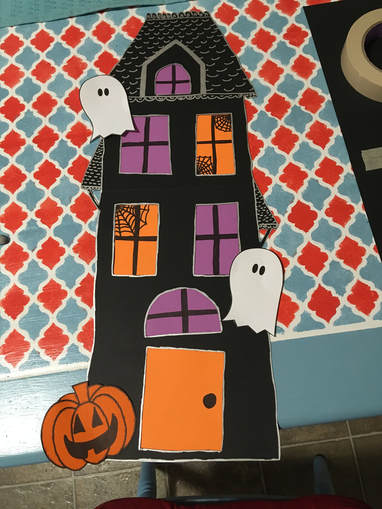
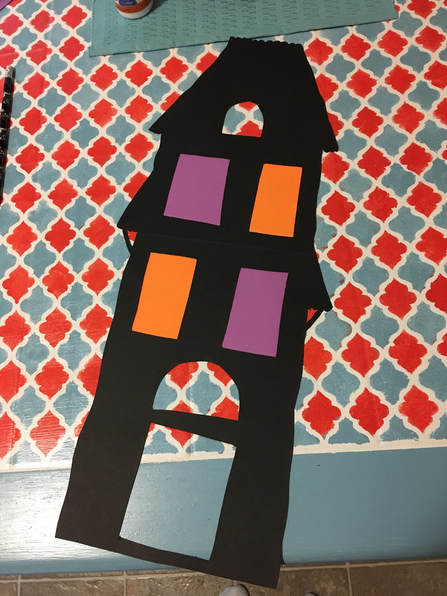
The Haunted House
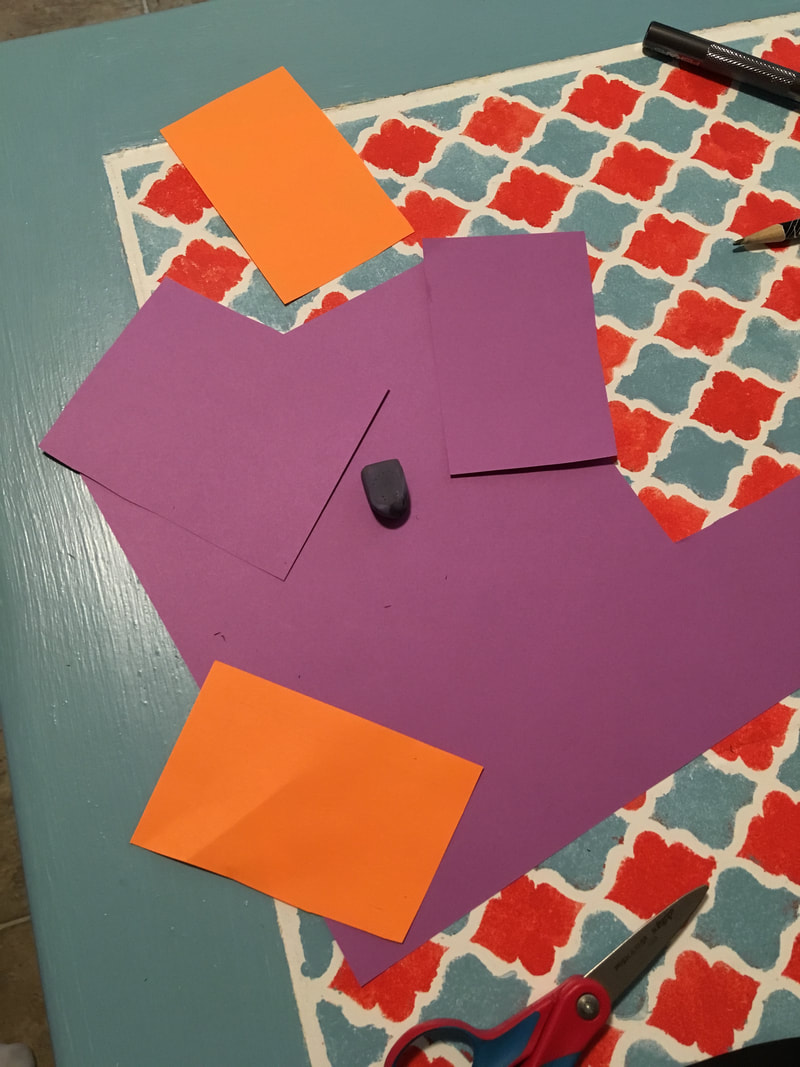
This project took a couple of hours to put together, but it's totally worth it. Very first thing I did was google cute Haunted House clipart. I was looking at different types of houses to see what kind of look I like and what fitted with what I needed. I realized that I needed something tall and skinny for my background, or else my chair will cover up most of the house for most of the lesson. So after finding a house I like and suited what I needed, I set up the papers I needed for the house and drew the template by hand.
Trust me, I am not an artist. What I love about making Haunted Houses is that it's meant to look funky and wobbly. So any artistic level can make a haunted house. I kept the photo of the house next to me for reference as I drew it out.
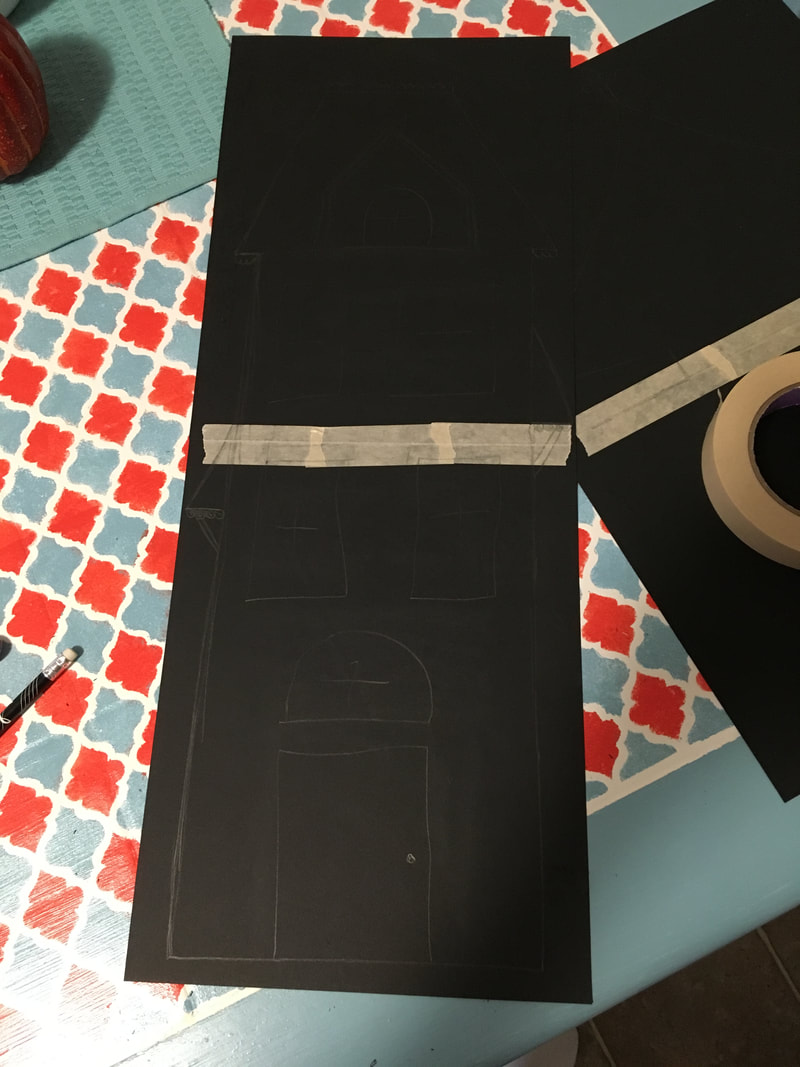
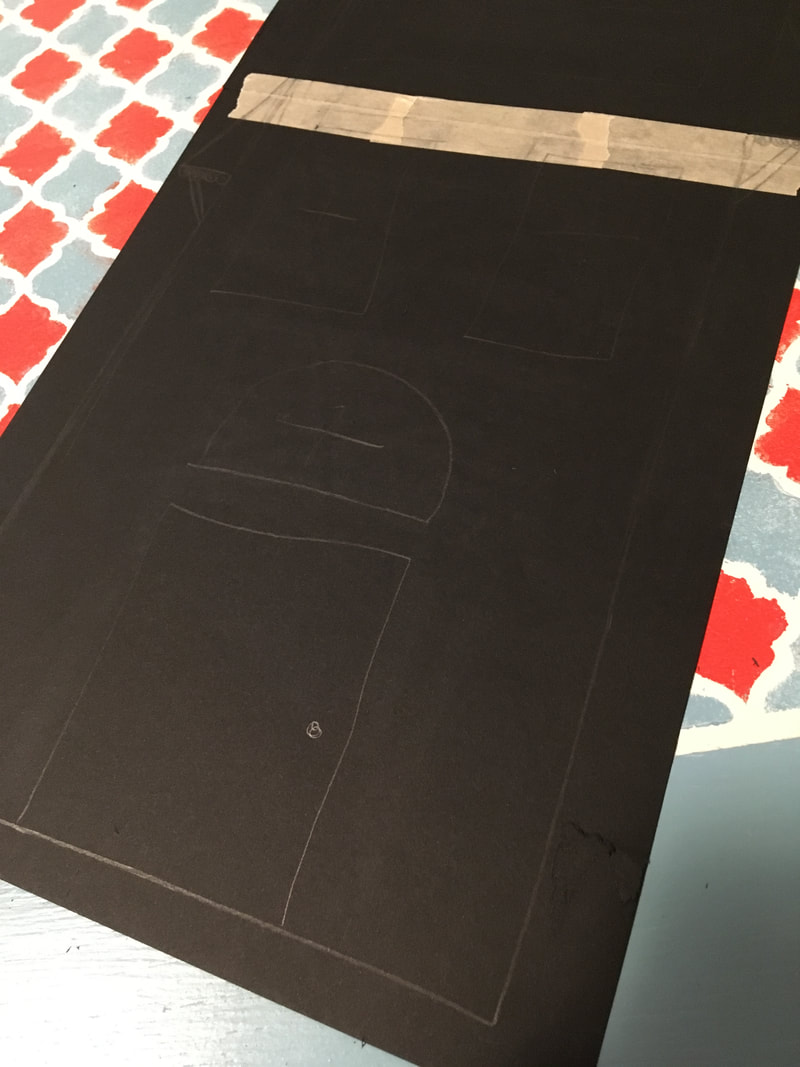
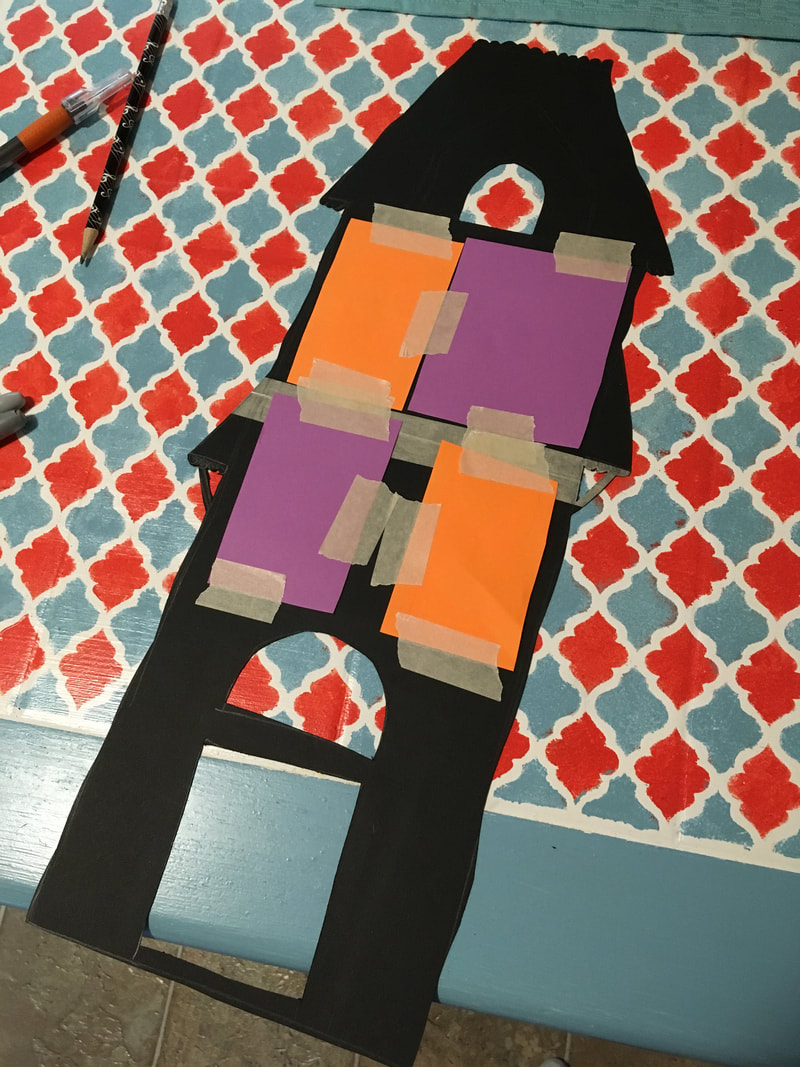
As you can see, I took 2 black papers and taped them together vertically, creating a tall and skinny house. I did not tape or glue the papers on the front together. Later on, you'll be using plenty of tape that it won't need it. After this is all done, I cut out the house. 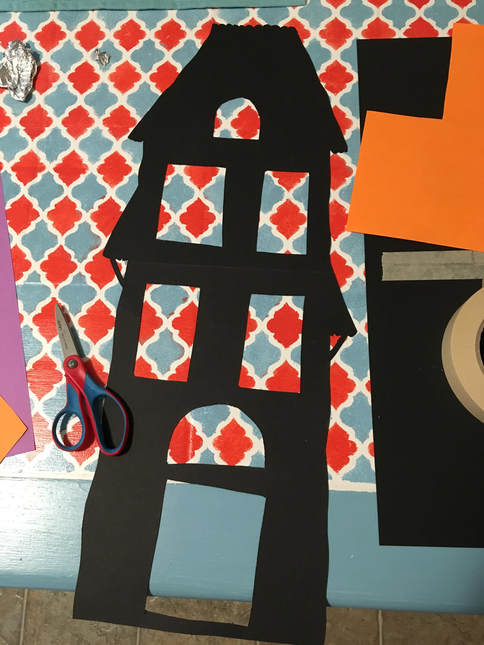
I used a craft knife to cut out the windows, door, and bar under the roofs. Craft knifes take some practice to cut perfectly straight lines. Luckily for us, this is a Haunted House. It doesn't matter how straight the windows and door are!
While you have the option of leaving the windows be and color them in yourself. I decided to add a little color to my house and make the windows and door different Halloween colors. I saw this from another haunted house as I was doing my research and LOVED it. You grab the colors you want and cut the paper to the size of your windows. To get the size I needed, I took the paper and lightly traced the edge of the window onto the paper. Then when I cut out the paper, I made it bigger than the trace I drew from the house. Then I taped it onto the back of the house.
So far, very simple. The longest part of this project is coming up with your design and then adding the decorations. I used a silver sharpie to draw the tiles. I drew a line because I wanted to make a distinction between the house the roofs on the side of the house. From there, I just decided to draw an outline for the entire house, including the windows and door. I drew on the spider webs and bars to make the window pane. You can do this before you tape the windows onto the house, but I did it afterwards. Either works.
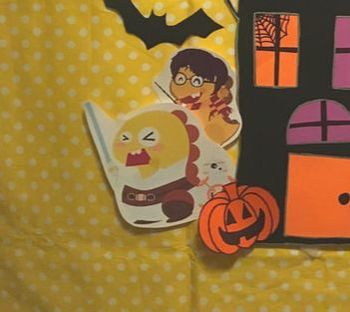
I added the pumpkins and ghosts to add to the overall cuteness of the house. I already had them from previous projects. You can find the link to download a printable for the ghosts on this page. So there you have it, my adorable Halloween background. I have several rewards created just for this background, Dress Dino, Dino costume, Halloween Hello Kitty, and I'm going to create a candy reward for my 5 year old beginners. All of these you can find on Prop and Reward Facebook groups. Because they're not my creation, I do not feel I can share them on my site. I'm sure you can find them. Thanks for reading! Like my Facebook or Pinterest page. Subscribe below if that's your thing. Again, next week, I'm going to be talking about my tips and tricks for using velcro for those classrooms where you don't have another surface to prop up your rewards. Stay tuned!
P.S. If you think this will be a fun job to join, I’d love to help you through the interview process. You can email me with the mail icon below for any questions. My referral code (for when you apply) is: 04A7J3
As promised, here are more Halloween Decoration ideas for your home. This is a series post, if you are interested, read Part 1. Again, I'll be sharing projects that I have found and made. I'll provide links and any additional tips you'll need to make this project successful! Thanks for reading!
Spooky Haunted House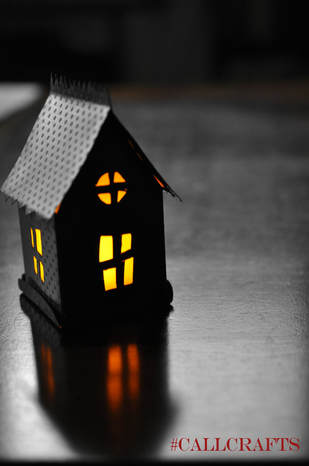
This project is a little more elaborate and time consuming, but has super cute results!
This is a paper house with a battery-powered candle inside. I got it from Catherine Holden's Inspired Barn. However, since I have visited her site, she has deleted the post. You can still find this template on my Pinterest page. Just make sure it's only for personal use. Making the house is pretty self explanatory. Even on the template it tells you where to cut and fold. I used a baking sheet to cover the back of the windows instead of buying a sheer paper. It also creates a sheer effect on your windows, and its something I already had in my home. I simply taped it onto the inside of the house before I folded it all together. Instead of using just black card stock, I purchased a textured scrapbook paper to add more to the look. I love it. I printed out the template of the house on a separate piece of white paper and then traced it onto my black scrapbook paper with a silver sharpie that way I could see where to cut. If I was using a different color, I probably would’ve just printed it out on the scrapbook paper itself. To cut out the windows, you'll need a craft knife. Once you've cut it out and folded it, just glue it together on the extra flaps. I couldn’t figure out how the roof fit onto the rest of the house from the template and directions provided (which are now gone). So I improvised. I cut off the roof from the rest of the template. Then, I glued the top of the roof together, then cut out the points you see on the edges. Afterwards, glued it back onto the rest of the house. The house itself ends up being about 2 to 3 inches tall, but it’s still so cute! This is one of the templates you can use to create a little village. I was going to make another house, but I never made the time after I finished this one. I’m sure you have the freedom to cut out the roof in any style you want or even make the roof a different color than the house itself. I also liked how easy it is to take the house off the base for easy access to the candle. You probably don’t even have to cut out a base, honestly. I'm a little sad to find that this project has been removed from the blog universe. It's super cute and easy to make. I even bought a craft knife specifically for this project and have rarely used it since. Bat Lamp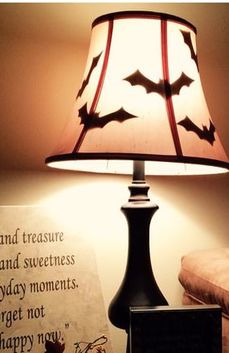
Give yourself a reason to turn on your lamp this Halloween!
This is a super easy project to get done. I saw the idea on Pinterest. I actually looked online for bat printables and found a free printable through Our Hopeful Home. You can also find this on my Halloween Pinterest page. I cut out the bats and then taped this onto the part of the lamp shade you see. I didn't have enough bats to cover the entire circumference of the lamp shade, but then, why would put bats on the part of the lamp shade you can't see? So far, I've probably only spent $15-$25 on decorations, probably even less! Most of the crafts I made were with things I already had; colored paper, twine, and acrylic paint. Then many of the other things I needed cost less than a dollar. Talk about awesome. Thanks for reading, be sure to stay tuned for more Fall decor ideas. Soon, I'll be sharing my Thanksgiving crafts. You're going to love them! Subscribe if you wish, or join my Facebook or Pinterest page. See you next time! 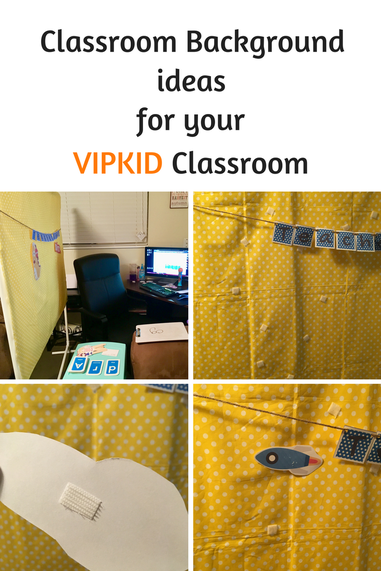
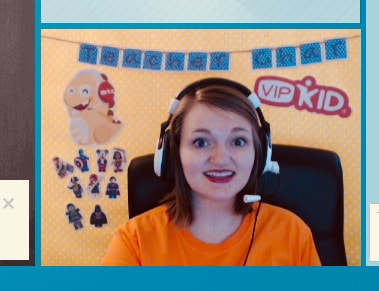
Welcome back, VIPKID teachers! I hope last night's frenzy treated you just as well as it treated me. I FINALLY have a completely booked schedule for the next two weeks! Whoot whoot! Took me 6 weeks to get there, and here's hoping it stays that way!
Anyways, I'm assuming that if you're reading this post, you've probably already read my other two background posts: Backgrounds for your VIPKID Classroom and Mid Autumn Festival Background. If you haven't read those posts, be sure to check those out for some inspiration. Today's post is a little more about the nitty-gritty details of it's development. Plus, I'll be revealing some of my newest background projects (!!). Before we continue, I wanted to make this disclaimer: I am not advertising in any way. I have no idea if this set-up has affected my booking rates in any fashion. This is something that I have come up with and I wanted to share it with you. For me, it keeps the classes interesting. I love decorating and making decorations; it's a creative outlet for me. All I know is that in my 40 days, I've had consistent bookings. But it just might be my adorable personality...no idea! This is also with Level 2 students in my mind, I have no idea what older kids would think... 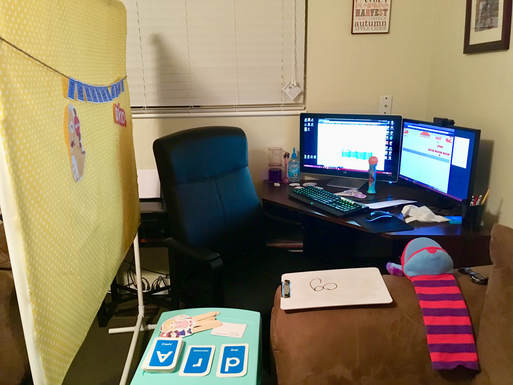
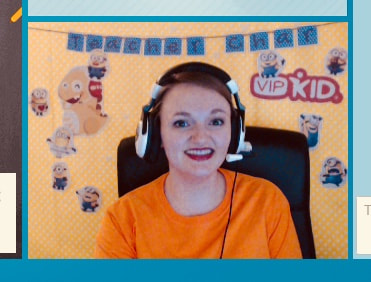
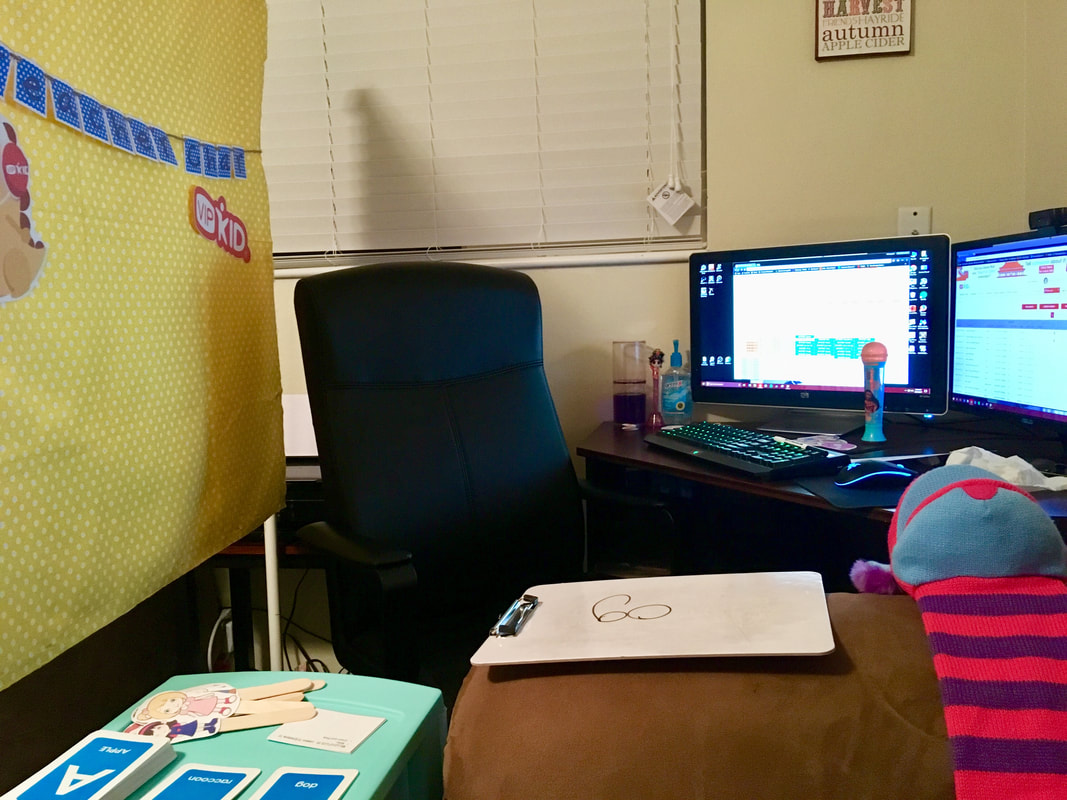
This is my classroom. I work on my husband's desk, which sits in a corner of our living room.
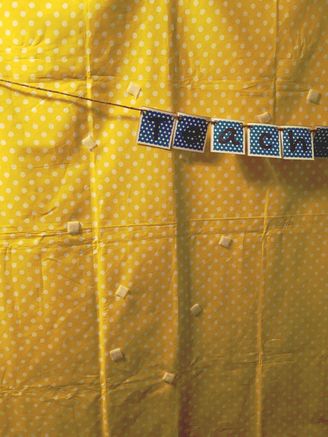
As you can see, my classroom background is held up by a PVC frame, you can read about how I constructed this frame here: PVC Pipe Stand. So far, it's pretty great. It takes 3 minutes to set up and put away the frame and the fabric and another minute to set up the background I want. It's also easy to store as well. The down-side is since the pieces are 5' long, I can't take this frame with me on a plane. Unless you cut the pieces into smaller chunks and connect them... I might do that and let you know how it goes...stay tuned.... I've printed out several images of Dino and tape one them up everyday, again, it's the variety that keeps things interesting for me. I've also printed out the VIPKID logo, and then I've created a banner that has my name on it. This is my "typical" set-up. It's for days I don't feel like being creative and just want something up.
Pretty simple, but cute. This isn't a specific theme, so in terms of rewards, I can use any of the ones I've created, like Legos. As you see in the photo on the right, I have some rewards placed up after the student has earned them. These rewards are put on with tape. It worked for a while and if I only put those rewards in that corner of my background. Eventually, the tape gets old and doesn't guarantee sticking for an entire lesson. I've had several drop on me during lessons. It's a little embarrassing.
So here is my solution:
VELCRO!!
I've placed about 15-20 (I lost count...) pieces of loop velcro onto my fabric. I used the velcro that has an adhesive back on it. And unless you buy a industrial strength version, you'll need to sew the loop velcro onto your fabric as well for reinforcement. Just be aware that it'll ruin your sewing needle with a awful stickiness...so maybe don't use an adhesive back for your loop velcro and just sew it on in the first place. :D Or just don't care about it because you don't want to buy two versions of velcro. I LOVE this because now my set-up is even FASTER. I use the velcro as markers for where I place my pictures and banners and I'll know that they'll fit on the screen the way I want them to. Plus now my rewards can be scattered throughout the screen instead of just stuck in one corner, like this: 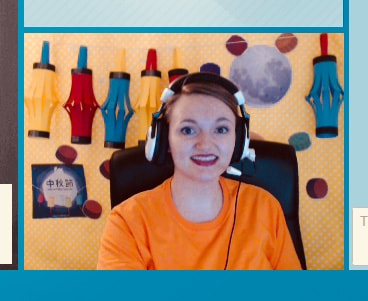
This is from my Mid Autumn Festival Background. Read more about it here.
As I've been taping hook velcro pieces onto my rewards. I came across another problem: I need WAY more hook pieces than I need loop pieces. I don't want to keep buying loop pieces whenever I run out of hook pieces! Well luckily Amazon is amazing and they sell just hook pieces. You can find it here. Note: I am not a part of an affiliate program with Amazon, I'm just sharing the wealth. I'm going to make life EASIER for me buy purchasing the count coins instead of the roll of tape. It saves time on cutting out the pieces. So there you have it, a typical day in the set-up of my classroom. Next, I'll be sharing my Starry Sky background. Further on this month, I'll be revealing my Halloween background. I'm so excited! I've been collecting reward clipart, including this fun one where Dino is dressed in different costumes. Thanks for reading, subscribe if you can't wait to see my Halloween background. Or join my Facebook page. Links are at the top of the page. See you next time!
P.S. If you think this will be a fun job to join, I’d love to help you through the interview process. You can email me with the mail icon below for any questions. My referral code (for when you apply) is: 04A7J3
Want more tricks? Check out my new post: My VIPKID Classroom Upgrade. You'll love it!
It’s coming! The holiday seasons! Even though Halloween is not my favorite holiday, it’s still super fun to decorate for. I guess this holiday is a bit sentimental for me because last Halloween two things happened: I discovered what a rich resource Pinterest is for free printables; and I discovered my niche for paper crafts. I’m not talking about scrapbooking, but using printables to decorate my home.
In this post, I’ll be sharing with you a few things I’ve used to decorate my home, what extra flair I’ve come up with, and provide links so you can make it yourself. Don't worry, I'll be sharing more of my ideas and findings throughout this month. 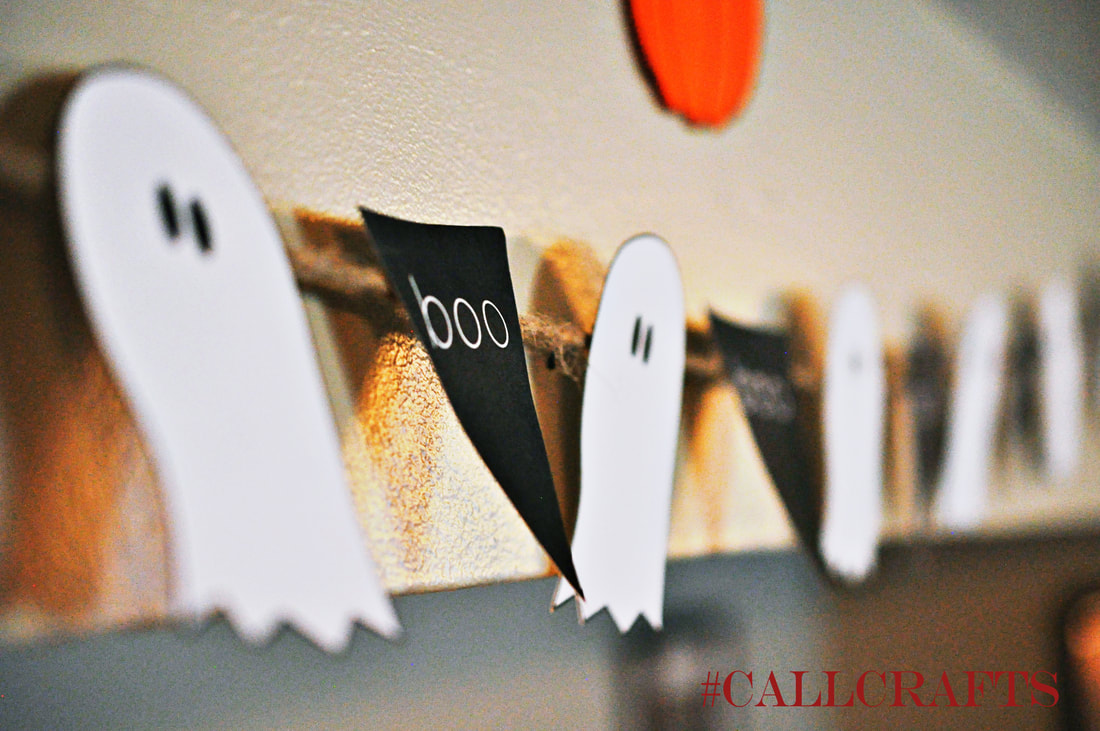
Boo Banner
So we’ll start off with one of my favorites: the Boo Banner.
I LOVE banners, they’re easy and fun to make. This one is no exception. And this one is probably one of my favorites. I got this printable from Tatertots & Jello. Click here to head to their site and print this adorable banner out for your home. Once you’ve printed and cut it out, roughly measure out how much string you need to hang your banner on. I use twine, it suits my home so nicely and it’s cheap. I’ve used it for MANY projects. Then, I simply taped it onto the string. Can’t see the back so why worry about doing something fancier. Now a days, I use a hole punch then “sew” it on when I make new banners, but I didn’t have one at the time. Note: when you print out the ghosts and “boo” signs, you may not end up using all of the “boo” signs. I’ve kept my extra ones and will let you know if I end up using it for something incredible. I do not have the luxury of having a mantel in my home yet, so what I do is take push pins, I have black ones, and place them on the wall above the tv. To place the string on, I simply create a loop and then tie a double knot. That way it’s easy to put on and take off. Halloween Subway Art Canvas
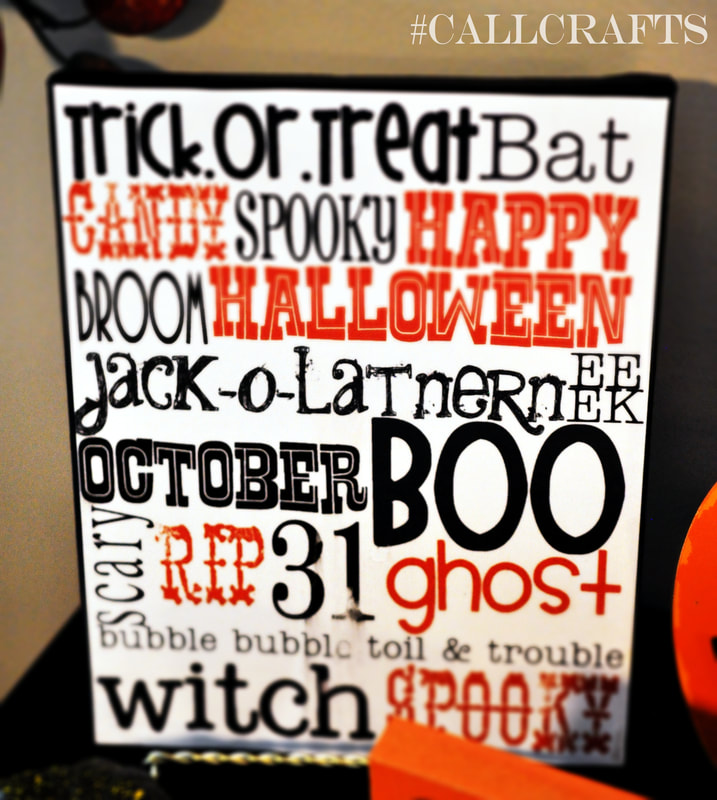
Next, is my Halloween subway art canvas. I can’t remember how I came up with this idea, but I love it and have some form of subway art up on my wall for every holiday. What I’ve done to save a few bucks is instead of having it on a frame, I mod podged it onto a canvas. There are tons of sites that give you a step-by-step tutorial. Since I created this project before I decided to make a blog, I don’t have photos of this process, but I will briefly describe it for you.
This is one of those awesome projects that only take a half hour to make. Which is great if you’re super busy (and who isn’t?). Before I tell you how to make it, click here to go to Lovely Little Snippets where you can download this for free!
Now, first thing I do when making a canvas project is that I trace the outline of the canvas onto the back of my subway art. This way, your printable fits on the canvas. I usually double check to make sure I’ve cut off enough. Sometimes I like to have it a little smaller than the canvas so I have a “frame.” Then I paint the edges and outer rim of the front. I paint the front just in case I cut off too much and I’m not left with a white frame. I usually use at least two coats of paint, but it depends on the color. Using only one coat doesn’t completely cover the canvas and will leave white streaks on your edge. Once the paint is dry, then paint the modge podge onto the canvas. You can put on the paper first, but I find it easier to put it on a harder surface first; it won’t curl up on you as you’re putting it on. Then you place the paper onto the canvas. It’ll still be wet at first for you to adjust and make sure it’s all centered. Then I like rubbing it in to get all the air bubbles out. Sometimes I’ll flip it upside down and rub the back of the canvas. If you do this, just make sure there isn’t extra podge sticking out or it’ll stick to whatever surface you’re using. Not fun. Then let it dry. I used to make the mistake of immediately putting on the top coat, but don’t. You WILL get air bubbles on your canvas this way. Once it’s sat for about 5 minutes, you’re usually good to put on the top coat. You don’t have to do this, but it does protect your project from peeling off at the corners. Like I said, very easy, affordable, and cute. Spell on You Printable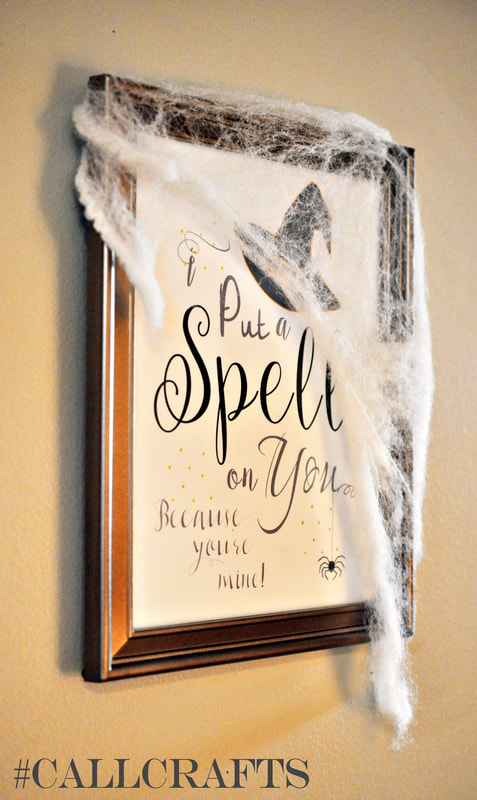
Then there’s this cute printable from Made in a Day.
What I like about this printable is that this designer gives you several versions with different color schemes to pick from. I actually ended up using a different version than what I originally saw on the pin. I’m also one of those super sappy people who likes to put up lovey-dovey decorations like this because she loves her husband so much! I simply put this in a dollar store frame I already had. It matches so well. And then draped on that cotton “spider web” you can get at Walmart for a buck. It’s the little things that really add to your decorations. So there you have it, a few things I've found online that I've printed out at home that have become a part of my home decor. Check out this Pinterest page, Crafts for Halloween for more ideas on how to create your own Halloween decorations. Follow me on Pinterest so you can keep up to date on my fabulous findings. See you next time!
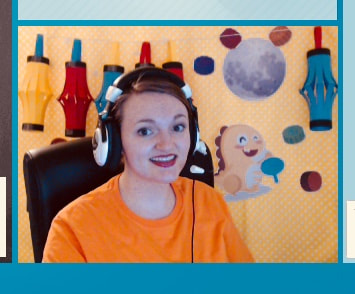
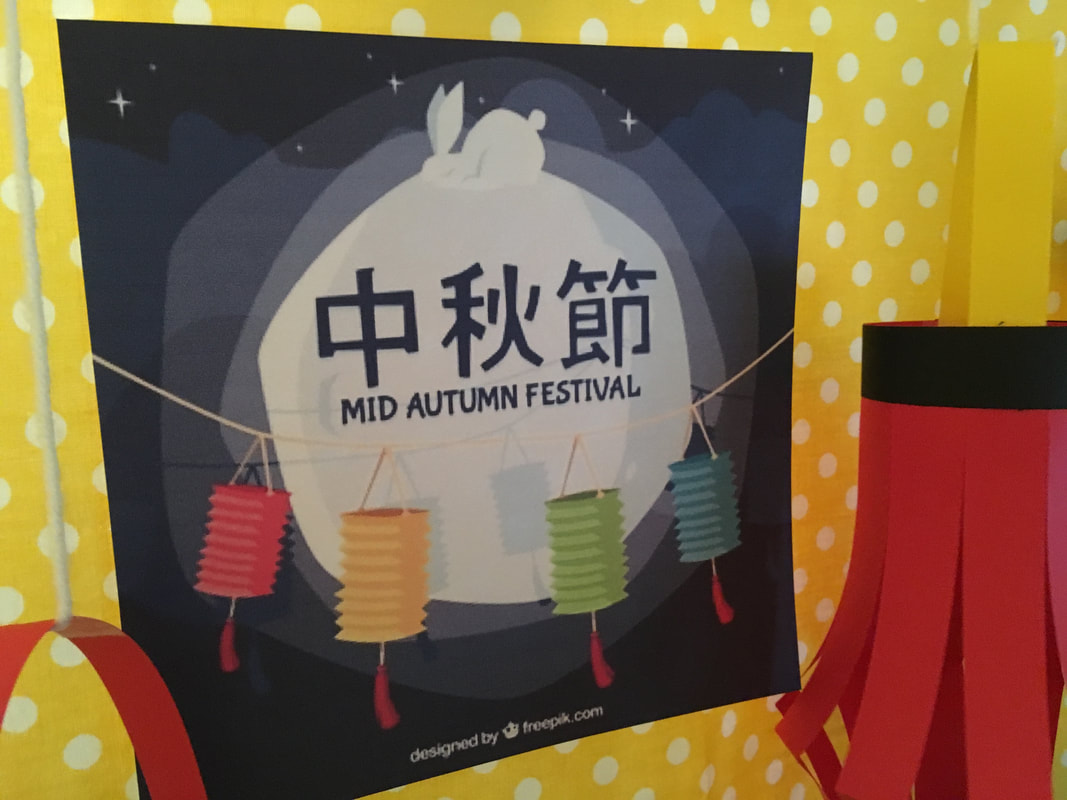
This week, it is the Chinese National Day and the Mid-Autumn Festival. Their holiday lasts for a whole week! I saw several teachers on my VIPKID FB pages post rewards they've created for their students. I decided to get into the holiday spirit and create a background and rewards that match this holiday. And I have LOVED the result!
Don't you love it!! These two images are a combination of the reward and the decor. So it is a little busy...but it is marvelously busy. I was so excited to make this as soon as I heard about the holiday. And it will be staying up all week.
I traveled a TON before I got married. My Dad serves in the Air Force and we were fortunate enough to be stationed overseas for 10 years. I loved learning about different cultures; their customs, habits, holidays, stories, etc. I've even adopted some of these into my own personal life. We spent most of our time in Europe, but we spent 3 years in Japan. I LOVED living in Japan. The Japanese people are so kind. I'm starting to feel the same as I've been teaching my Chinese students. It's been so fun. So in creating this project, I combined two of my favorite things: crafting and cultures. It's the best. Most of research was done on China Highlights. Here, I read about so many cool stories and learned about what they do during the holiday. I can't wait until I teach older kids so I can talk to them about this holiday and what their family plans to do. If you want to learn more about it, click here. 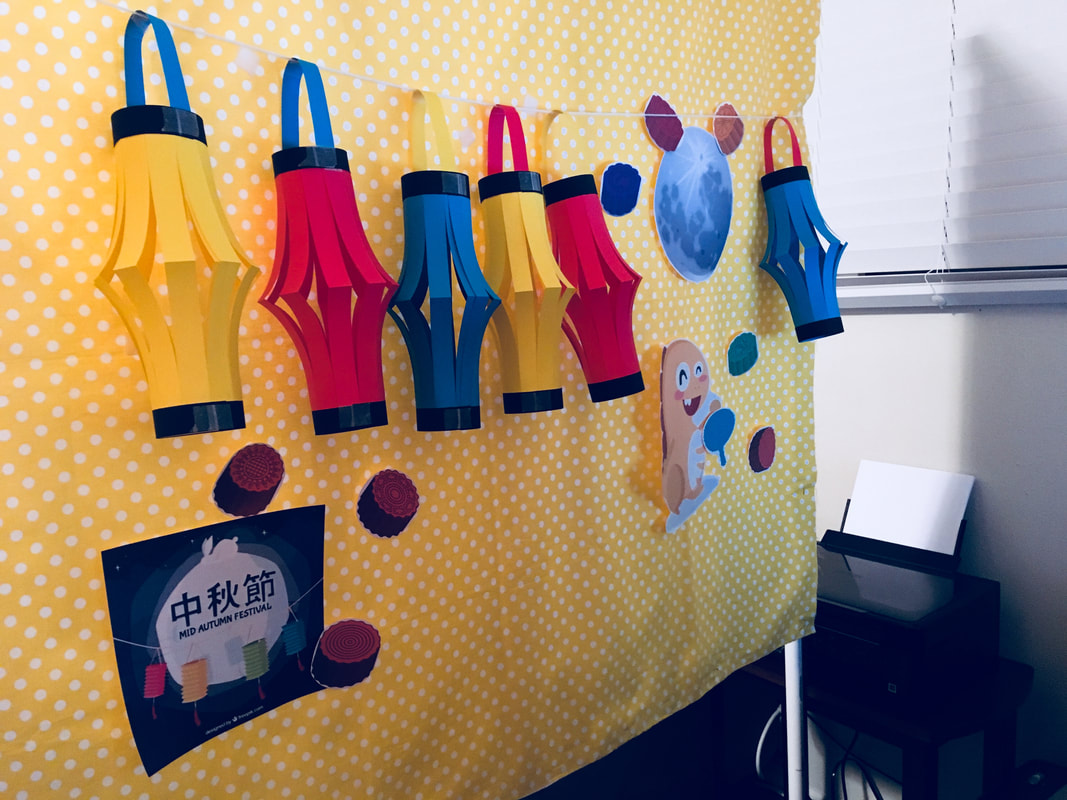
I'll be sharing some of the traditions I've incorporated into this decor as well. So that you too can have an cultural education!
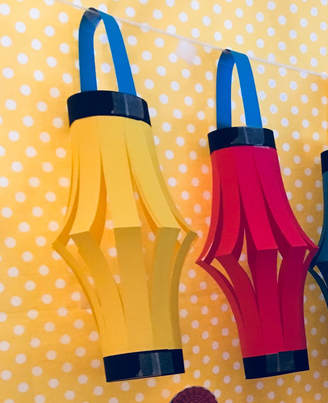
I'll start with the lanterns. Chinese Paper Lanterns
Paper lanterns are a well-known part of Chinese culture, so of course I had to have those on my background. Turns out a part of the holiday is to light lanterns. However, they aren't all red like the ones for the Chinese New Year. They have lanterns of different colors, shapes, and sizes. Many lanterns lit in cities are in the shapes of different animals and people. It's like walking around the neighborhood and seeing the inflatable Christmas decor. It's just made out of paper. I have a pin on my Pinterest page that I used to make these paper lanterns.
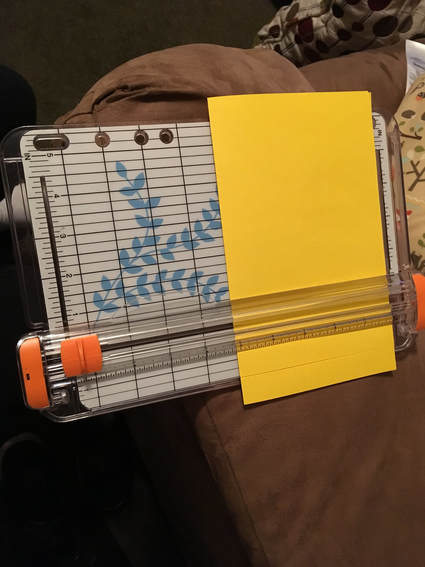
I used my handy-dandy paper cutter to make it straight and even. I easily got six done in a half hour.
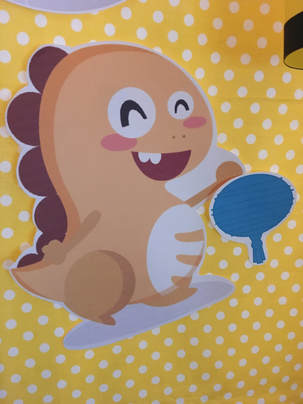
If you noticed, I changed out what the color of the handle would be and even added strips of black paper on the top and bottom for more color. It's beautiful! Even Dino (the VIPKID mascot) gets to hold a lantern too.
Mooncakes
Just like how we have eggnog and candy canes during Christmas, the Chinese have mooncakes during the Mid-Autumn Festival. My understanding though is that its seen like how we see fruitcake, a delicacy no one really likes anymore (Edit: this is not true. When I was presenting this award to another student, she showed me about 5 of them she had). But I needed a reward for the students and this was a pretty good one. I found the images online and printed them. Of course, I do not own the rights to these images and use them at my own risk. To find more images, simply Google, Mooncakes.
So at the beginning of the lesson, the mooncakes aren't on the wall, they are added as students complete activities. The Moon
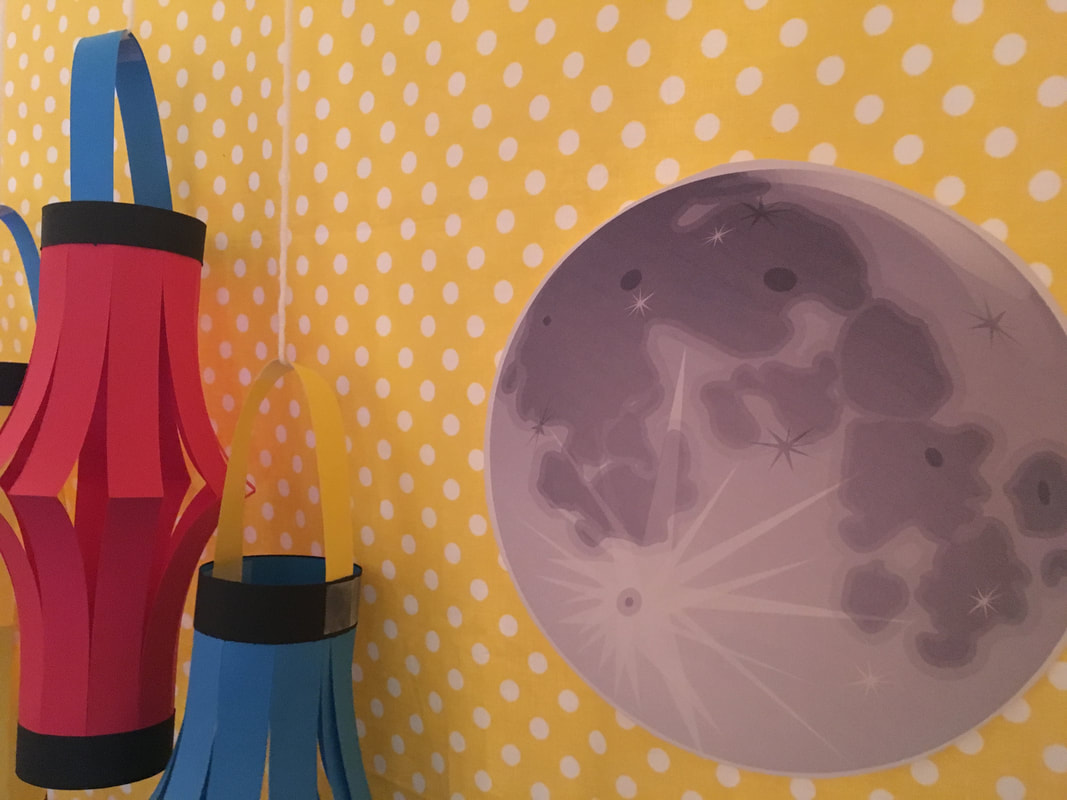
Of course the moon must be included. It's a part of the name of the holiday. In fact, the moon is worshipped on this holiday.
Again, these images were found online and must be for personal use only. I Googled Moon clipart for the moon on the right. The image on the left I found on Freepik. And so far, it's a pretty awesome sight! I actually signed up for an account that night for Freepik because it had what I needed for my designing. There's a reason why the Moon is worshipped on this holiday. A long time ago, a warrior was given an elixir to become immortal for saving the Earth. However, this warrior loved his wife and chose to stay with her as a mortal. So he kept the elixir in his home. One day, a thief comes to steal this elixir for himself. The wife drank the elixir instead of allowing this crook to keep it. Once she became immortal, she flew to the moon, where it is said that she still lives there and will live there forever. In remembrance of his wife, the warrior began to pray and gave offerings to the moon. And the tradition as continued since.
The jade rabbit is also an icon for this holiday (as you can see on the photo above on the left). That is because the rabbit also lives with Chang'e (the woman on the moon). It is of his selfless sacrifice to the immortals.
So there you have it, the decor, the inspiration, and the stories! What a great blog post :D
Thanks for reading, folks! I have loved sharing this holiday with you and I hope the parents of my students appreciate what I have done (and I really hope I've done nothing wrong or offensive). Again, subscribe if you are interested in more VIPKID ideas or even just crafting ideas. You can follow my Facebook or Pinterest page as well. The links are on the top of the page. Thanks for reading!
P.S. If you think this will be a fun job to join, I’d love to help you through the interview process. You can email me with the mail icon below for any questions. My referral code (for when you apply) is: 04A7J3
|
About Me
Hello! My name is Char. Thank you for visiting my blog, CallCrafts. I am a wife and mother who LOVES to make things. Read tutorials on crafts I've created to decorate my home, for parties, and more! Read more about me in My Story.
Categories
All
Archives
April 2018
Popular Posts |