RSS Feed
|
It’s coming! The holiday seasons! Even though Halloween is not my favorite holiday, it’s still super fun to decorate for. I guess this holiday is a bit sentimental for me because last Halloween two things happened: I discovered what a rich resource Pinterest is for free printables; and I discovered my niche for paper crafts. I’m not talking about scrapbooking, but using printables to decorate my home.
In this post, I’ll be sharing with you a few things I’ve used to decorate my home, what extra flair I’ve come up with, and provide links so you can make it yourself. Don't worry, I'll be sharing more of my ideas and findings throughout this month. 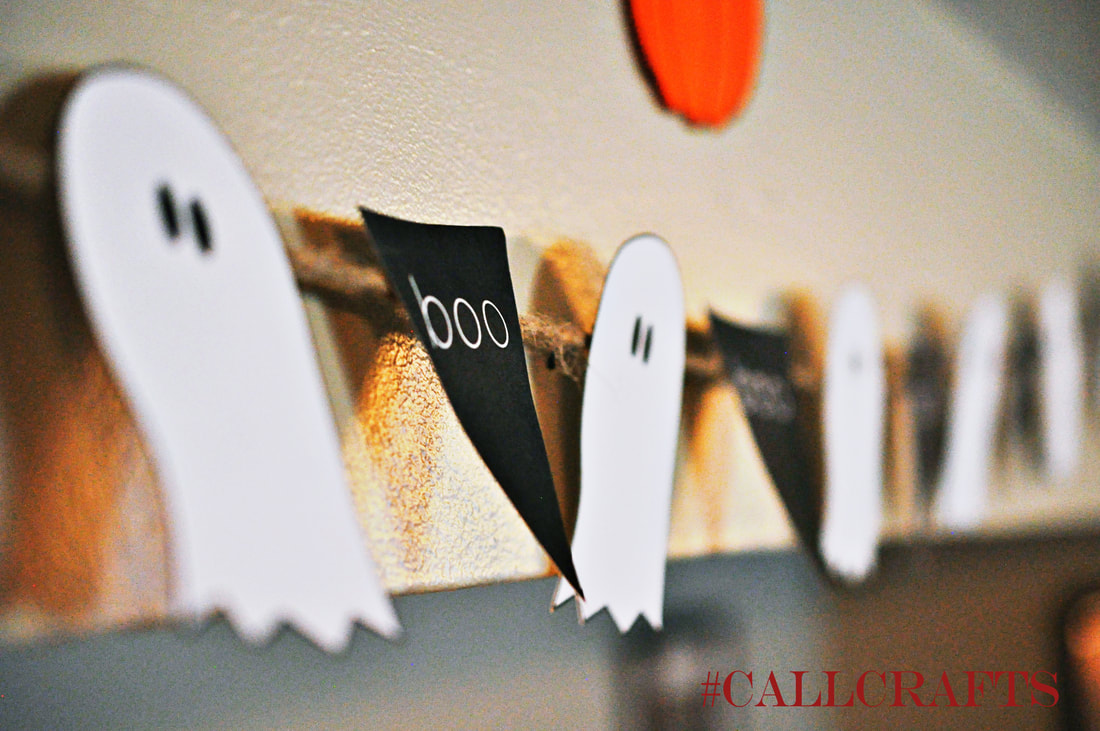
Boo Banner
So we’ll start off with one of my favorites: the Boo Banner.
I LOVE banners, they’re easy and fun to make. This one is no exception. And this one is probably one of my favorites. I got this printable from Tatertots & Jello. Click here to head to their site and print this adorable banner out for your home. Once you’ve printed and cut it out, roughly measure out how much string you need to hang your banner on. I use twine, it suits my home so nicely and it’s cheap. I’ve used it for MANY projects. Then, I simply taped it onto the string. Can’t see the back so why worry about doing something fancier. Now a days, I use a hole punch then “sew” it on when I make new banners, but I didn’t have one at the time. Note: when you print out the ghosts and “boo” signs, you may not end up using all of the “boo” signs. I’ve kept my extra ones and will let you know if I end up using it for something incredible. I do not have the luxury of having a mantel in my home yet, so what I do is take push pins, I have black ones, and place them on the wall above the tv. To place the string on, I simply create a loop and then tie a double knot. That way it’s easy to put on and take off. Halloween Subway Art Canvas
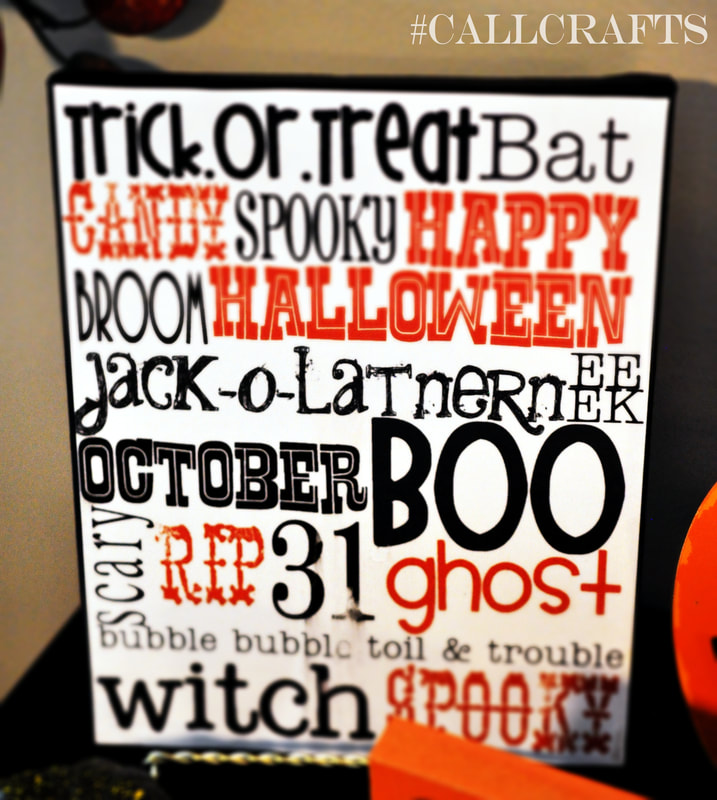
Next, is my Halloween subway art canvas. I can’t remember how I came up with this idea, but I love it and have some form of subway art up on my wall for every holiday. What I’ve done to save a few bucks is instead of having it on a frame, I mod podged it onto a canvas. There are tons of sites that give you a step-by-step tutorial. Since I created this project before I decided to make a blog, I don’t have photos of this process, but I will briefly describe it for you.
This is one of those awesome projects that only take a half hour to make. Which is great if you’re super busy (and who isn’t?). Before I tell you how to make it, click here to go to Lovely Little Snippets where you can download this for free!
Now, first thing I do when making a canvas project is that I trace the outline of the canvas onto the back of my subway art. This way, your printable fits on the canvas. I usually double check to make sure I’ve cut off enough. Sometimes I like to have it a little smaller than the canvas so I have a “frame.” Then I paint the edges and outer rim of the front. I paint the front just in case I cut off too much and I’m not left with a white frame. I usually use at least two coats of paint, but it depends on the color. Using only one coat doesn’t completely cover the canvas and will leave white streaks on your edge. Once the paint is dry, then paint the modge podge onto the canvas. You can put on the paper first, but I find it easier to put it on a harder surface first; it won’t curl up on you as you’re putting it on. Then you place the paper onto the canvas. It’ll still be wet at first for you to adjust and make sure it’s all centered. Then I like rubbing it in to get all the air bubbles out. Sometimes I’ll flip it upside down and rub the back of the canvas. If you do this, just make sure there isn’t extra podge sticking out or it’ll stick to whatever surface you’re using. Not fun. Then let it dry. I used to make the mistake of immediately putting on the top coat, but don’t. You WILL get air bubbles on your canvas this way. Once it’s sat for about 5 minutes, you’re usually good to put on the top coat. You don’t have to do this, but it does protect your project from peeling off at the corners. Like I said, very easy, affordable, and cute. Spell on You Printable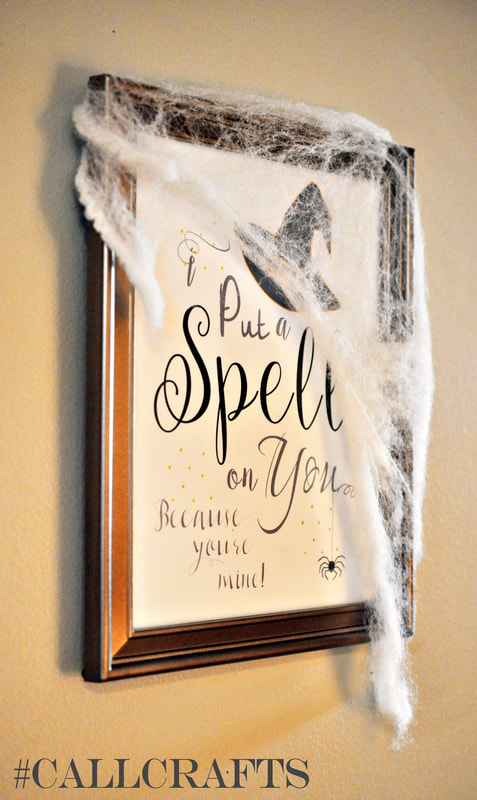
Then there’s this cute printable from Made in a Day.
What I like about this printable is that this designer gives you several versions with different color schemes to pick from. I actually ended up using a different version than what I originally saw on the pin. I’m also one of those super sappy people who likes to put up lovey-dovey decorations like this because she loves her husband so much! I simply put this in a dollar store frame I already had. It matches so well. And then draped on that cotton “spider web” you can get at Walmart for a buck. It’s the little things that really add to your decorations. So there you have it, a few things I've found online that I've printed out at home that have become a part of my home decor. Check out this Pinterest page, Crafts for Halloween for more ideas on how to create your own Halloween decorations. Follow me on Pinterest so you can keep up to date on my fabulous findings. See you next time!
0 Comments
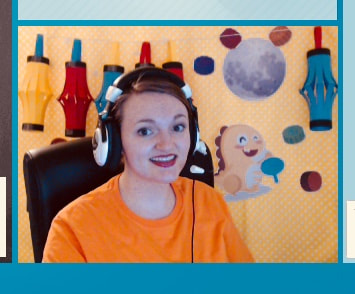
This week, it is the Chinese National Day and the Mid-Autumn Festival. Their holiday lasts for a whole week! I saw several teachers on my VIPKID FB pages post rewards they've created for their students. I decided to get into the holiday spirit and create a background and rewards that match this holiday. And I have LOVED the result!
Don't you love it!! These two images are a combination of the reward and the decor. So it is a little busy...but it is marvelously busy. I was so excited to make this as soon as I heard about the holiday. And it will be staying up all week.
I traveled a TON before I got married. My Dad serves in the Air Force and we were fortunate enough to be stationed overseas for 10 years. I loved learning about different cultures; their customs, habits, holidays, stories, etc. I've even adopted some of these into my own personal life. We spent most of our time in Europe, but we spent 3 years in Japan. I LOVED living in Japan. The Japanese people are so kind. I'm starting to feel the same as I've been teaching my Chinese students. It's been so fun. So in creating this project, I combined two of my favorite things: crafting and cultures. It's the best. Most of research was done on China Highlights. Here, I read about so many cool stories and learned about what they do during the holiday. I can't wait until I teach older kids so I can talk to them about this holiday and what their family plans to do. If you want to learn more about it, click here. 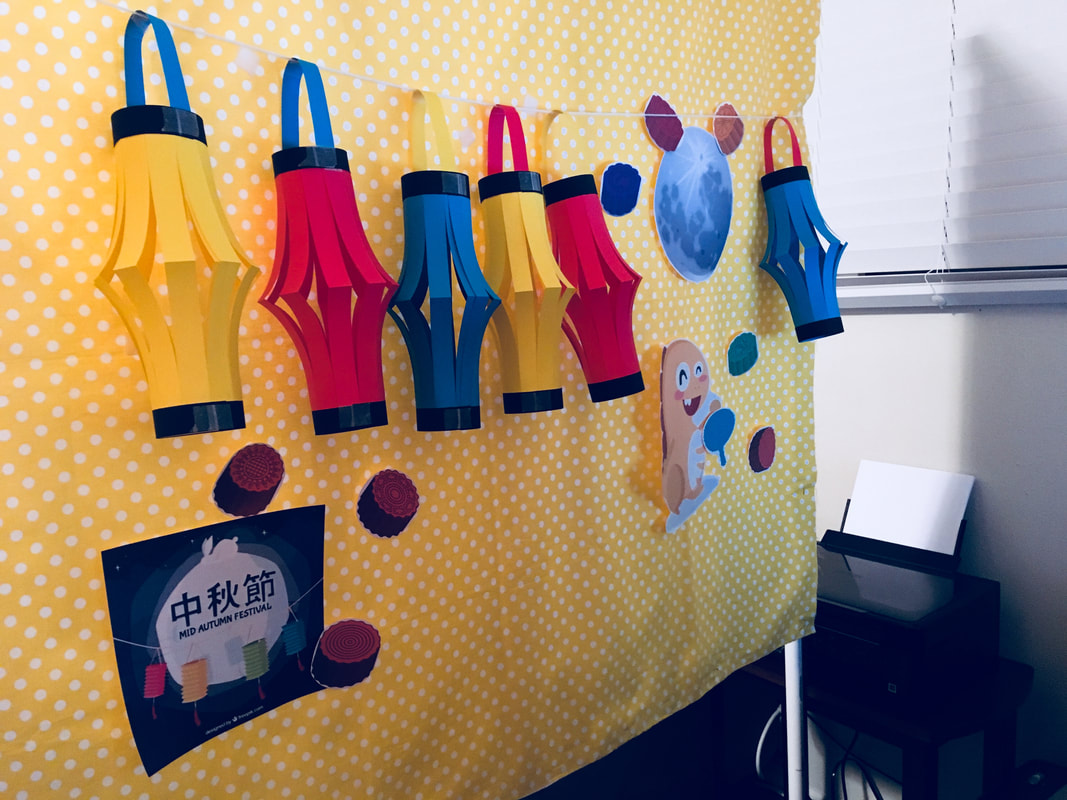
I'll be sharing some of the traditions I've incorporated into this decor as well. So that you too can have an cultural education!
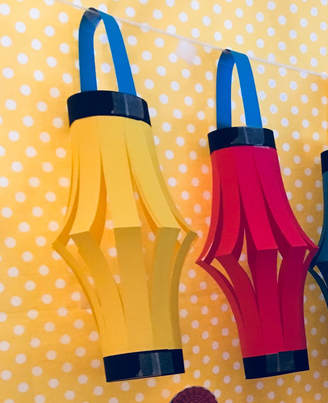
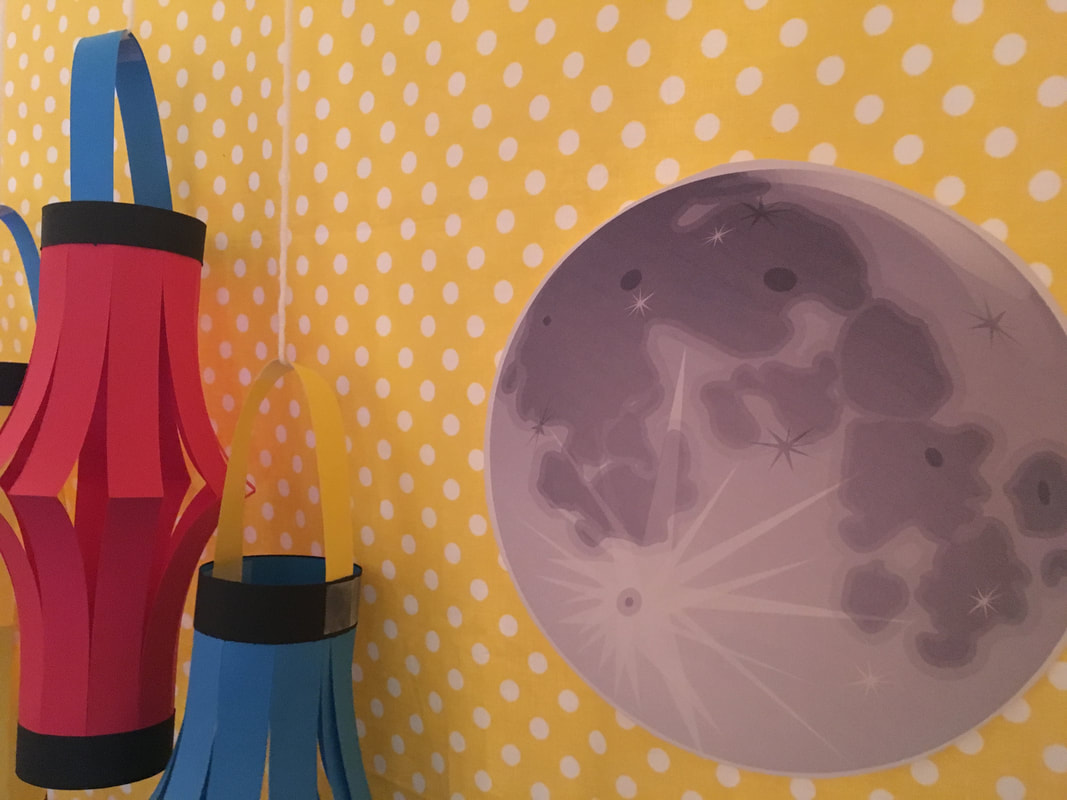
I'll start with the lanterns. Chinese Paper Lanterns
Paper lanterns are a well-known part of Chinese culture, so of course I had to have those on my background. Turns out a part of the holiday is to light lanterns. However, they aren't all red like the ones for the Chinese New Year. They have lanterns of different colors, shapes, and sizes. Many lanterns lit in cities are in the shapes of different animals and people. It's like walking around the neighborhood and seeing the inflatable Christmas decor. It's just made out of paper. I have a pin on my Pinterest page that I used to make these paper lanterns.
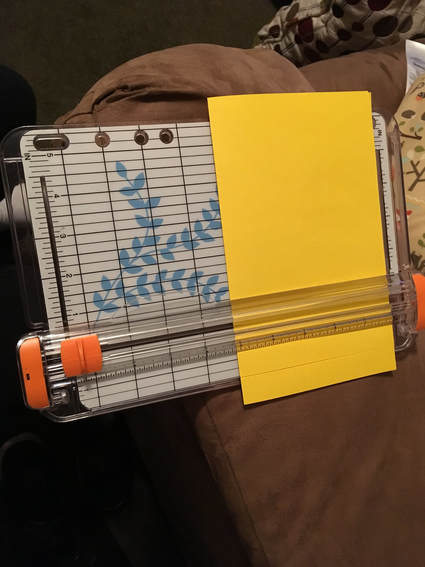
I used my handy-dandy paper cutter to make it straight and even. I easily got six done in a half hour.
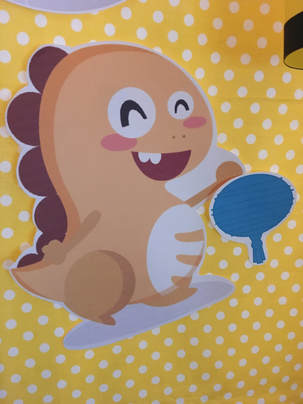
If you noticed, I changed out what the color of the handle would be and even added strips of black paper on the top and bottom for more color. It's beautiful! Even Dino (the VIPKID mascot) gets to hold a lantern too.
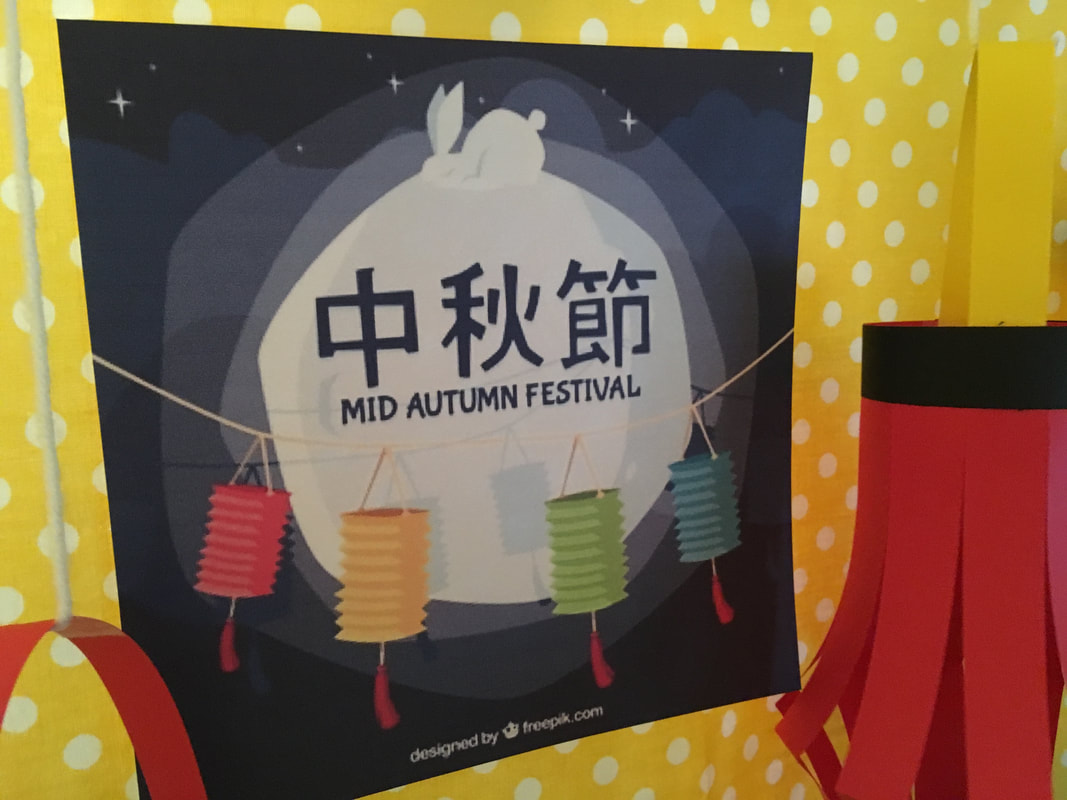
Mooncakes
Just like how we have eggnog and candy canes during Christmas, the Chinese have mooncakes during the Mid-Autumn Festival. My understanding though is that its seen like how we see fruitcake, a delicacy no one really likes anymore (Edit: this is not true. When I was presenting this award to another student, she showed me about 5 of them she had). But I needed a reward for the students and this was a pretty good one. I found the images online and printed them. Of course, I do not own the rights to these images and use them at my own risk. To find more images, simply Google, Mooncakes.
So at the beginning of the lesson, the mooncakes aren't on the wall, they are added as students complete activities. The Moon
Of course the moon must be included. It's a part of the name of the holiday. In fact, the moon is worshipped on this holiday.
Again, these images were found online and must be for personal use only. I Googled Moon clipart for the moon on the right. The image on the left I found on Freepik. And so far, it's a pretty awesome sight! I actually signed up for an account that night for Freepik because it had what I needed for my designing. There's a reason why the Moon is worshipped on this holiday. A long time ago, a warrior was given an elixir to become immortal for saving the Earth. However, this warrior loved his wife and chose to stay with her as a mortal. So he kept the elixir in his home. One day, a thief comes to steal this elixir for himself. The wife drank the elixir instead of allowing this crook to keep it. Once she became immortal, she flew to the moon, where it is said that she still lives there and will live there forever. In remembrance of his wife, the warrior began to pray and gave offerings to the moon. And the tradition as continued since.
The jade rabbit is also an icon for this holiday (as you can see on the photo above on the left). That is because the rabbit also lives with Chang'e (the woman on the moon). It is of his selfless sacrifice to the immortals.
So there you have it, the decor, the inspiration, and the stories! What a great blog post :D
Thanks for reading, folks! I have loved sharing this holiday with you and I hope the parents of my students appreciate what I have done (and I really hope I've done nothing wrong or offensive). Again, subscribe if you are interested in more VIPKID ideas or even just crafting ideas. You can follow my Facebook or Pinterest page as well. The links are on the top of the page. Thanks for reading!
P.S. If you think this will be a fun job to join, I’d love to help you through the interview process. You can email me with the mail icon below for any questions. My referral code (for when you apply) is: 04A7J3
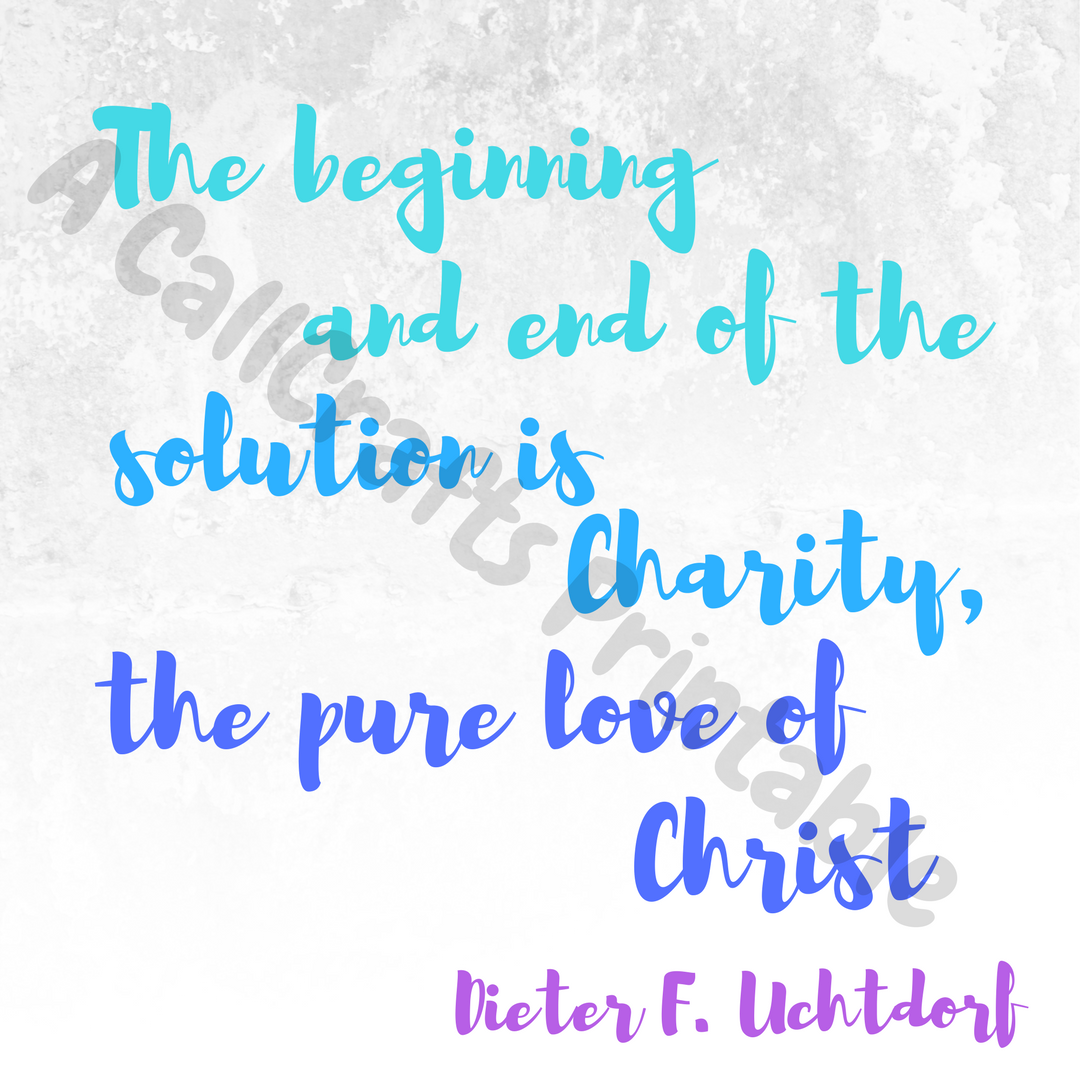
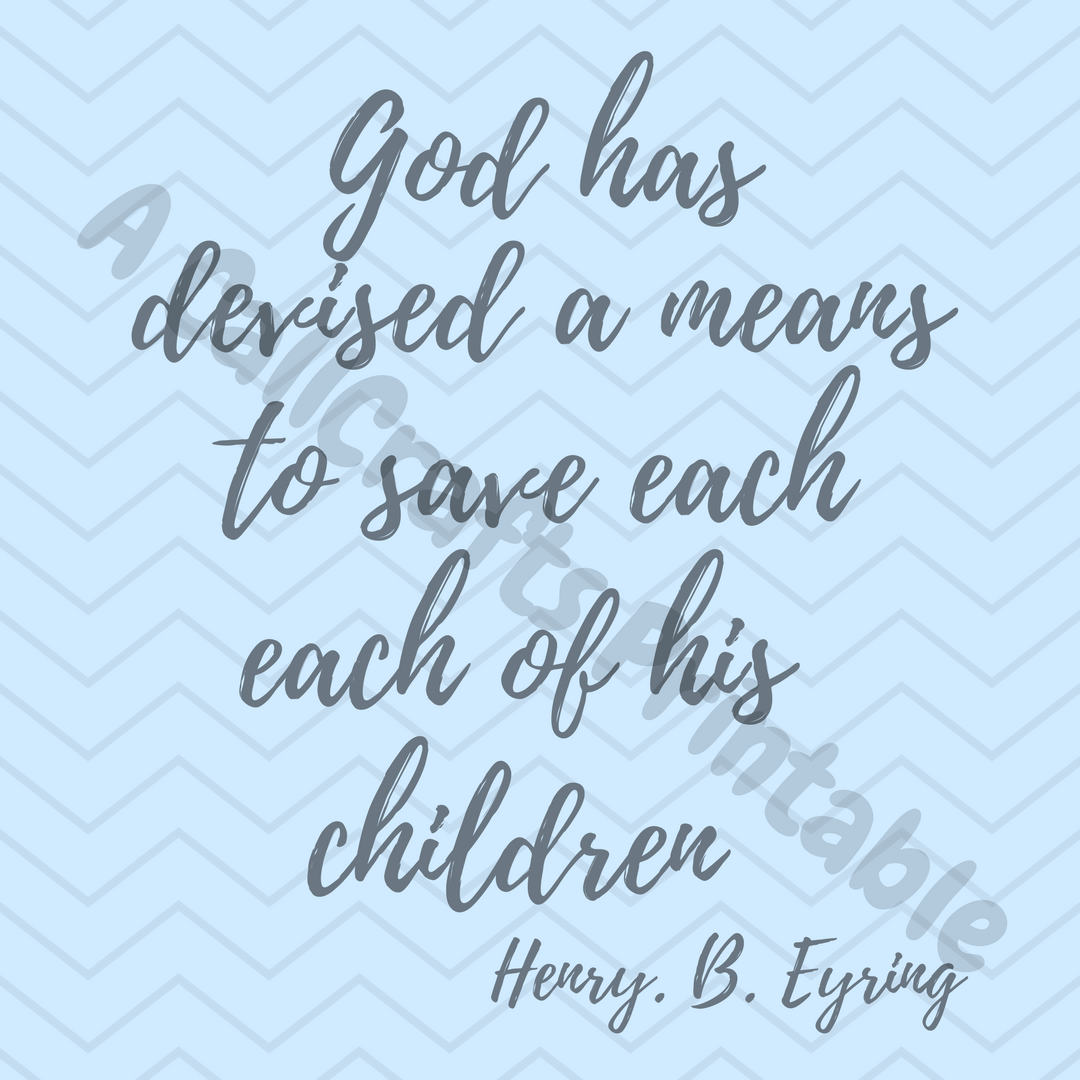
What a great message for this month! It's such a great reminder that despite any hardships we face, not just the ones in our families, we can turn to Christ.
Hope you all are having a great General Conference Weekend. My husband and I are having a great time. We made breakfast together. We had french toast, scrambled eggs, and hot chocolate. Yum! Plus it's grey outside, a perfect day for staying at home snuggled up in your pj's. I plan on creating a few General Conference memes, so stay tuned for those. Reading through this month's message, there were two quotes I was touched by. So instead of picking a favorite, I did both.
If you've noticed, there's a lovely watermark on the image. Well, folks, I want people to come to my site. So therefore, if people want to download my printable, they need to come to my site to do it. It's still free, its just not as easily accessible. Just click on the titles above for your free download. It's a png, but I can give it to you in PDF format, just let me know through my Contact Form.
Thank you for coming to visit. If you love what I do, please subscribe. It's at the top and the bottom of the page. You can also follow me on Facebook or Pinterest. Stay tuned for more inspiring quotes.
This is a follow-up post for my DIY - PVC Pipe Stand. In that post, I wrote how I created a classroom background for my job at VIPKIDS with PVC Pipe and Fabric. I’ve had an overwhelming number of you express interest in this project, it’s so great! Please continue to ask questions if you have any, I’d be happy to help.
In this post, I’ll be sharing how I use this to create backgrounds for my classroom. That’s right, I’ve created multiple backgrounds! 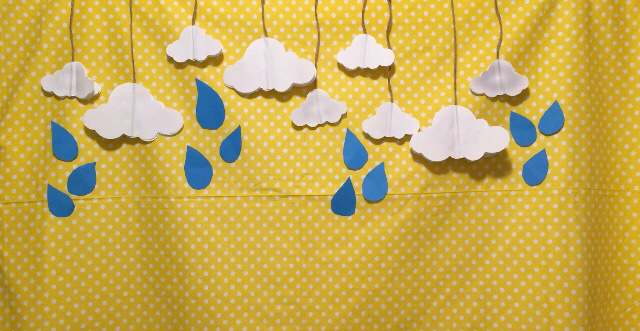
This one here is my very first background. It’s featured in my intro video (parents are able to choose their teacher and we must post photos, an intro video, and a short message for them to get to know us so they’ll pick us). I made the clouds a long time ago for an "UP" themed party from this site (unfortunately, the link on that site to the printable clouds doesn't work... you can just as easily find cloud clipart and make your own printable). Then cut out rain drop shapes with blue card stock paper free hand. Then I stick it onto the fabric with Scotch tape. Very simple, but hey, it works!
Due to the nature of my classroom set-up, if I want a student to always see their secondary reward, I have to put it up on my background. So what I’ve decided to do was create different themes and have a few rewards that go along with the theme. For the rain background you see above, I’m planning on dressing Dino with a raincoat, hat, boots, umbrella, etc. I haven’t made this yet, so stay tuned. Another background I’ve done with my clouds is that I’ve gotten rid of the rain drops and put up airplanes or balloons. I try to make sure I have a boy-centered reward and a girl-centered reward. 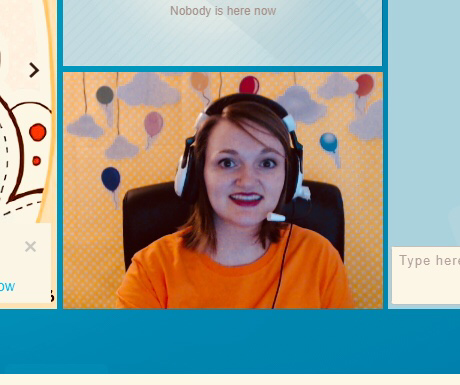
I start with just the clouds in the background and then slowly build up the background as I reward the student. After a while, you get a feel of where the airplanes go so you can see them on the screen.
Because of limited storage space and the nature of my classroom, I have to set-up and put away my classroom everyday I teach. I wake up a half hour before classes start to get ready. Setting up the stand, fabric, and background decor can take about 5-8 minutes (depending on which background I use).
I like the freedom of being able to pick and choose which backgrounds I use. For me, it helps keep things fresh that way I can be the best teacher possible.
Of course after a while, the tape loses its stick and I’ll have to replace the tape. But that is something I am OK living with. I’ve contemplated using Velcro and having some standard places I keep them up, but I’m not sure I want to make that commitment yet. I feel that once I place the Velcro onto the fabric, it can ruin the cute look of my fabric. Also, I won’t have as much freedom in what I want to do with my background and it can be expensive as I make more rewards... So many things to consider! Next time, I’ll post my night sky background and what cute/fun rewards I have for that background. Afterwards, I’ll share my standard classroom with a banner I created for my room. If you’d like to see these in the future, I won’t be posting them on any VIPKID Facebook group. Some groups don’t want me to and I feel the purpose of those pages isn’t to promote my blog. Join my Facebook page, CallCrafts (there’s a cute picture of me sipping a mug) or my Pinterest page. Eventually, I’ll set up an email subscriber list you can sign up for. *Edit: I have just recently opened a mailing subscribing list. Please continue to scroll to the bottom of the page to sign up!* Want more tricks? Check out my new post: My VIPKID Classroom Upgrade. You'll love it!
P.S. If you think this will be a fun job to join, I’d love to help you through the interview process. You can email me with the mail icon below for any questions. My referral code (for when you apply) is: 04A7J3
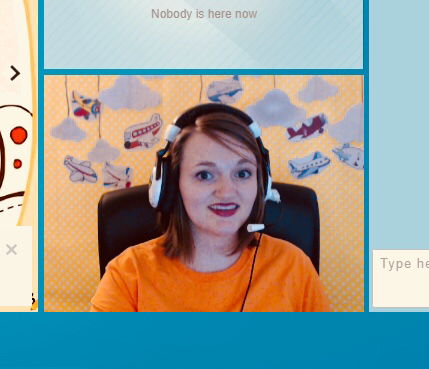
I've recently joined a company called, VIPKids. For those who haven't heard of this company, I stay home teaching kids in China how to speak English through video conference. It's been a great opportunity and I've been having so much fun.
I teach kids ages 5-12 and I have to provide my own props. These include toys, stuffed animals, and rewards. With everything I'm going to do to make my classroom fun, I'm going to be sharing here on my blog. Starting with this PVC Pipe Stand my husband and I created for my classroom. Here we go!
When I say, "classroom" I mean the background the students see during my lessons. They want teachers to create a welcoming, educational environment. They don't want the students to see your house. Makes sense. I could have easily used my laptop to teach and then just set up some space against a wall, however, my husband has a REALLY comfy chair, a nice headset, and his computer is connected to the ethernet (in order for conferences to work, and to get the job, you need a headset and good running internet).
After some debate, my husband and I agreed using his computer would be the best option for this job. Plus my husband is a gamer and he's always wanted a green screen. It was a great compromise. 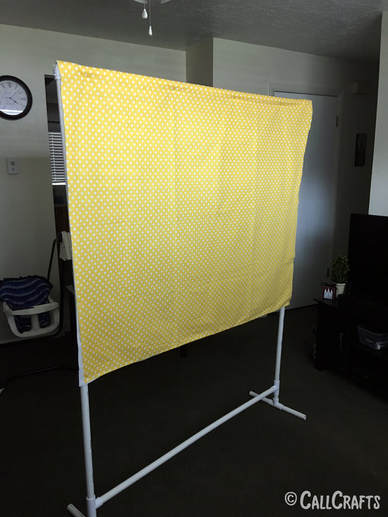
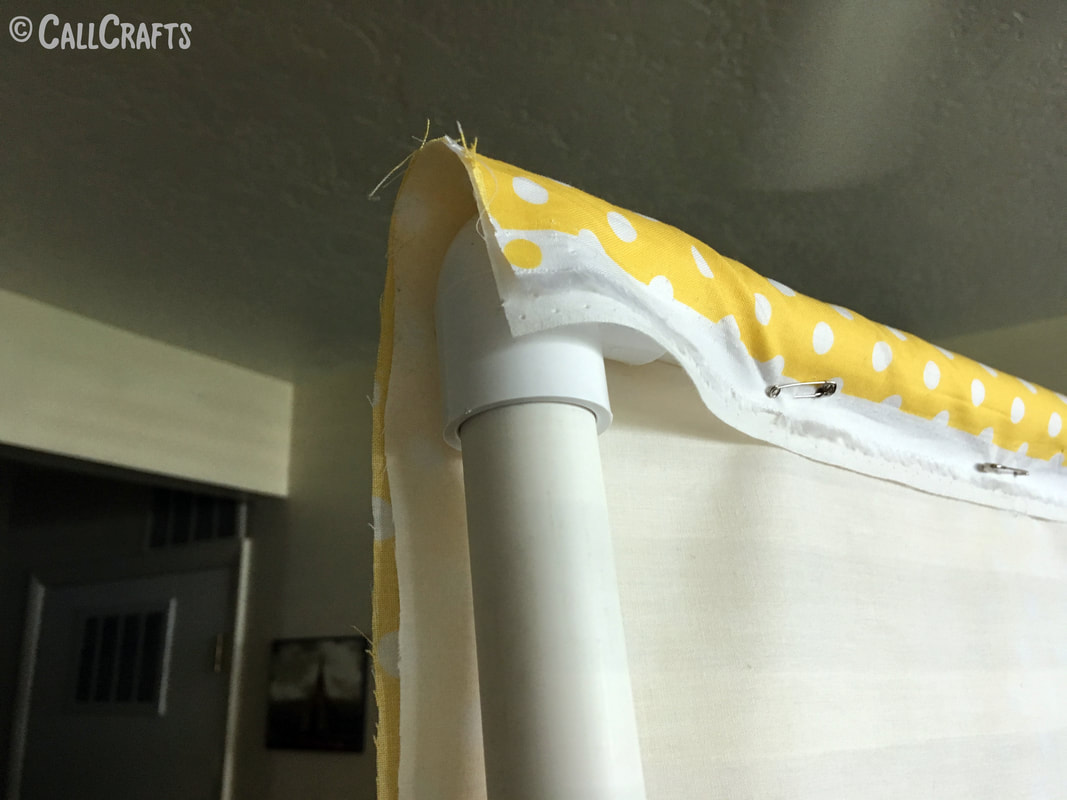
The size of the frame will depend on what size you need. We needed something 5'x4'. So the first step is to measure. How big does it need to be to do the job? I found a photo from Bible Money Matters with a blueprint I based my stand on. I just changed it so it fitted the size I needed.
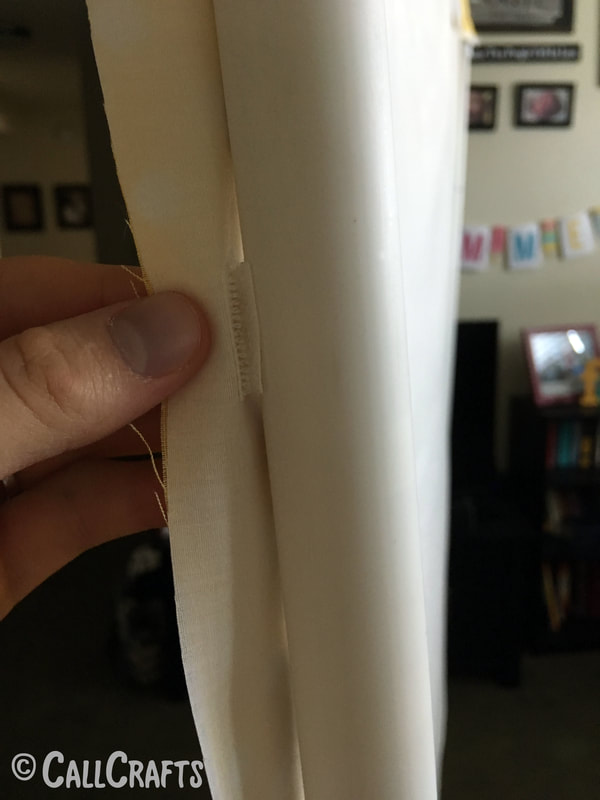
We only needed to buy 3 pipes for the job. We asked someone to cut the pipes there and we were on our way! The pipes and joints cost us $16 (as I am not a professional and just writing about my experience, this may not be the amount you will pay). Next we needed fabric. We bought a green fabric for the green screen and a fun, yellow fabric for my classroom background. In my research, I read that any kind of green will do, but the more obnoxious it is, the better. We also bought white fabric to place behind our colored fabric. This is to prevent people seeing through the fabric, makes the colors more solid. I use this stand to create a temporary wall while I teach and I don't want them to see through it to my living room. Assembling the stand was easy, once we were able to get the sizes we wanted. Then because I don't have a sewing machine, I safety pinned the white and colored fabric together. Ghetto, I know, but I'm the only one who sees it. So who cares!! Origionally, I was planning on clamping the fabric onto the frame with A clamps. But they were hard to manipulate. It was a huge hassle to put it up day in and day out. So here's what I did instead: 
I roughly measured how much fabric I needed for the width and cut off the excess. Then I took the pipe that would hold the hanging fabric and measured how much I needed to create a loop. This is where I'd push that top pipe through, having it hang effortlessly. Then I safety pinned it together.
I didn't pin right at the corners because I wanted the fabric to cover the edges of the stand, so the pins on the edge are further in. Then I bought Velcro with an adhesive back. I taped it into the fabric and then onto the pipe.
And now set-up and takedown only takes a couple of minutes. Super easy. Now with this background, I have the freedom to change it however I want. I currently have two backgrounds I'll use regularly and am working on a third, "standard" background. One of them is a rainy day background and the other is a starry sky. With these, I can incorporate student rewards into my background. Like put up rockets and aliens for the starry sky background.
In future posts, I'll be sharing backgrounds I've created and how I use them in my classroom. Thanks for reading. Follow me on Facebook or Pinterest. I'll keep posting fun ideas!
P.S. If you think this will be a fun job to join, I’d love to help you through the interview process. You can email me with the mail icon below for any questions. My referral code (for when you apply) is: 04A7J3
Ha. I'm so punny.
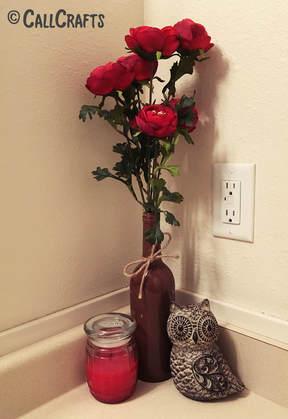
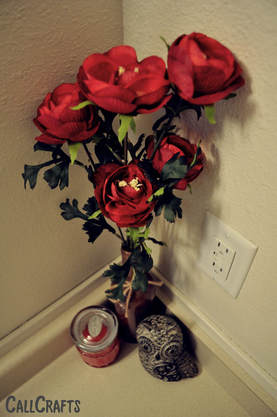
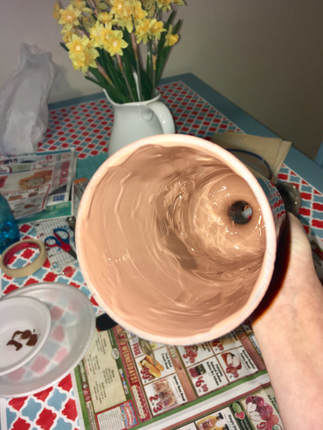
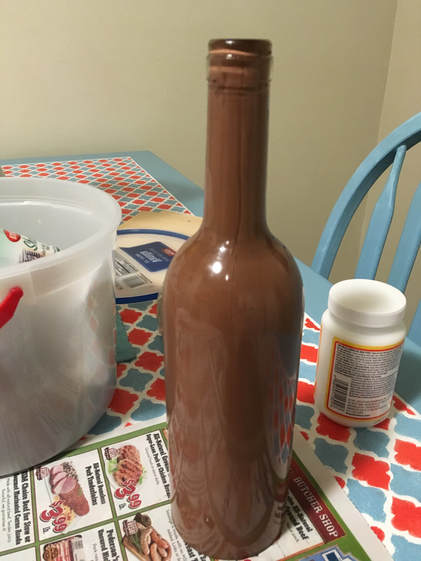
This craft came to be because I needed something tall-ish for my bathroom. We moved to a new apartment and the countertop is long. Believe me, I love the space, but it needed a little something or it would end up looking empty and lame. I let the idea marinate in my mind for a month or two to figure out what I wanted there. Soon I decided I wanted flowers with a couple of pieces next to it in the corner. Great. How to get a vase that isn't expensive and something I like. I don't know, but I don't really like the vases I kept finding at craft stores. Some of them are too elaborate for me, others aren't the shape I'm looking for, and then others just cost too much money. One day, I was at Walmart, getting some things I needed. I had the time and energy, so I decided to look around and see if I could find anything I needed for my crafting projects (yea, I keep a to-do list of craft projects, and things I need for them, on my phone). First I found these beautiful flowers and grabbed two stems. With these flowers, I decided I needed a tall, skinny vase to go along with it. So I turned around and looked at the vases available. Then I found the bottomless wine bottle. It was the perfect height and width. The only problem was it was a clear bottle. I wasn't fond of the idea that you could see the stems of these flowers. But then I thought, what if I just painted the bottle? I did a quick search online and found several different ways people had done it and found a method I liked. This is the method I will share in this post. This project is simple, but a little time consuming. But all you do is take the color pain you want and spread the paint all through the inside of the bottle. Most people tip the bottle around until the paint covers the entire bottle. That took a little too long for me, so I simply grabbed my brush and spread the paint around. This is one benefit of having a bottomless bottle.
Then you tip the bottle over and let it dry. This took a couple of days because I had the bottle standing right up, so the part that needed to get dry wasn't because it was covered. After a couple of days, I got smart and flipped it over and it dried in a couple of hours.
And done!! Still love this piece and the flowers that go with it. See how well they compliment the counter? It really adds to it. I also added a little twine bow for extra cuteness. So easy and this project cost me $5. Thanks for reading, for more craft ideas, follow me on Facebook or Pinterest. I'll set up a subscriber email soon, don't worry. This is still a new blog.
I've finally created and posted this month's Visiting Teaching Message! Better late than never, right?
What a great message this month! It's so amazing how the power of the Atonement can change our hearts to make us more like Christ. This is the quote I selected for this month. 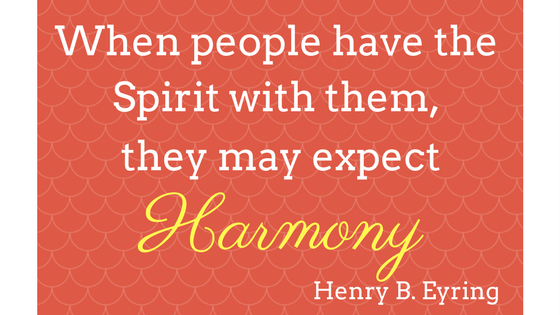
Expect Harmony - Sept. 2017
It's so true! When you follow the commandments, everything in life seems to come together. Click on the title above to download a PDF version of this design.
Thanks for following! Stay in tune for future posts! 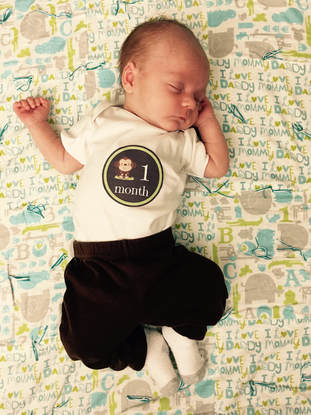
I have the cutest baby ever! A few weeks ago, he turned one month old. And he'll be two months old next Saturday (holy cow! Where did the time go?!).
Of course I have to take those monthly photos and share them on FB, but I thought, I'd really like to design my own stickers. So I made these. I choose to feature a monkey on these stickers because of his "monkey" toes. He can spread them out so wide and the curl them up so tight that he could probably grab something with his toes. I found this design on Miss Kate Cuttables. I am not receiving an financial compensation for this information, just simply sharing where I received my clipart. So after I created the design, I printed them out on printable sticker paper. I got mine at Hobby Lobby. Just make sure it's a plain sheet that it isn't made for a specific shape. Then you cut them out and stick them on a plain onsie!! As I do not own the rights to the adorable monkey clipart on my sticker, I cannot distribute this design. But stay updated on more craft and designs.
Sorry I've been MIA. It's been SUCH a busy month! I've been adjusting to the duties of Motherhood, making sure I get enough sleep, and I applied for and was accepted as a teacher for VIPkids!!
I am soooooo excited to be a part of this company. I can still earn an income and be a SAHM. I am so lucky! I love being home with my son. And maybe one day I'll earn an income from blogging too. Baby steps...baby steps.
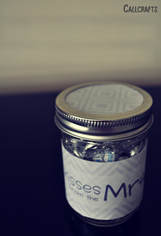
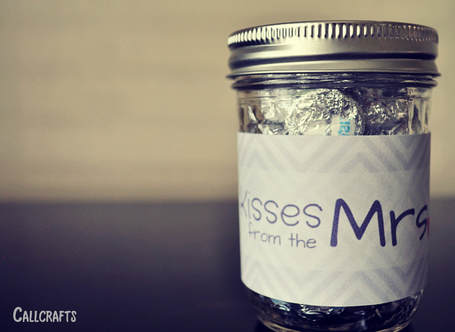
This project is easy to make. I found the idea on Pinterest, but I couldn't find a printable. All of the labels were handwritten. I have a confession to make, I don't have great handwriting. So I decided to design my own label.
When I created the printable, I printed it out, cut it out, and taped it onto the jar. See? Simple. It was a labor of love, as I gave this jar to my husband when it was finished. Below is the image of the printable. Just click on the title below the image to download. Enjoy!! 

Kisses from the Mrs. Jar Label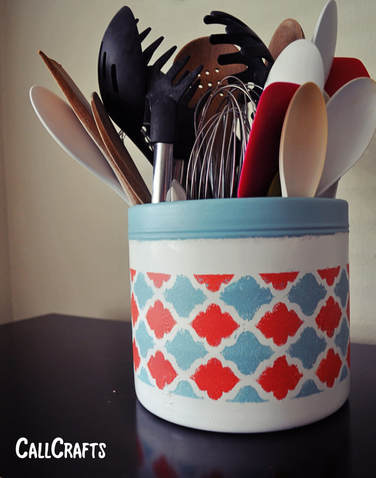
Clever title, huh?
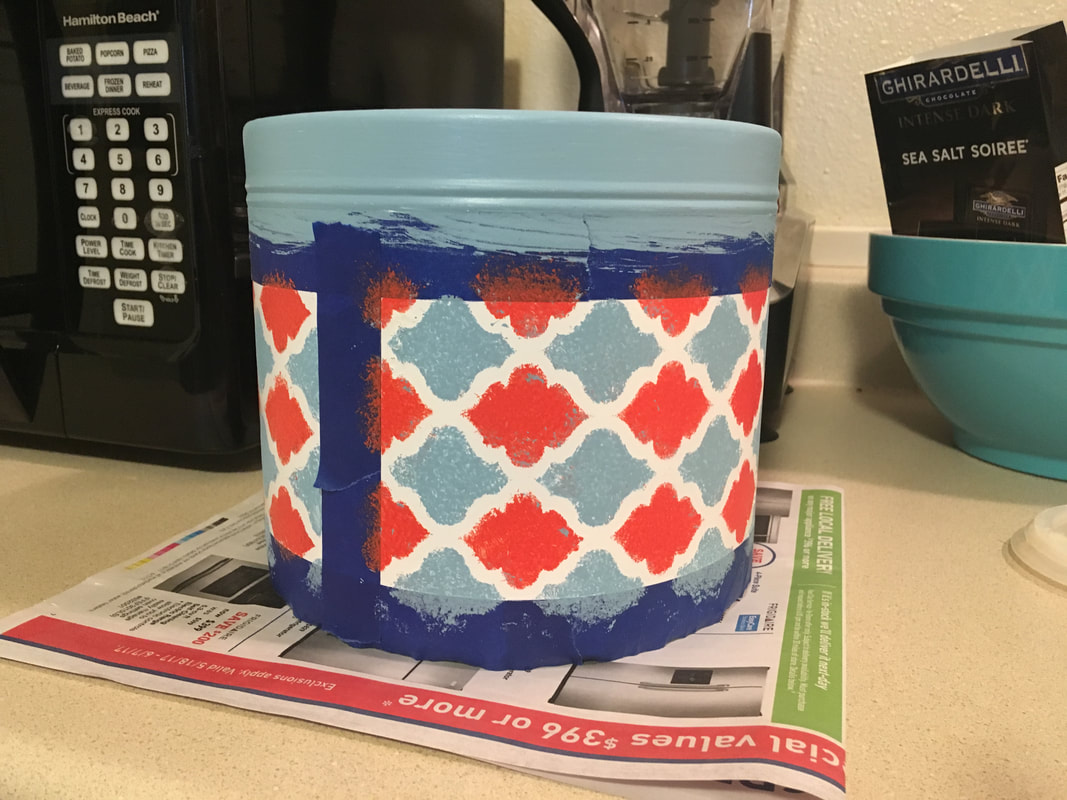
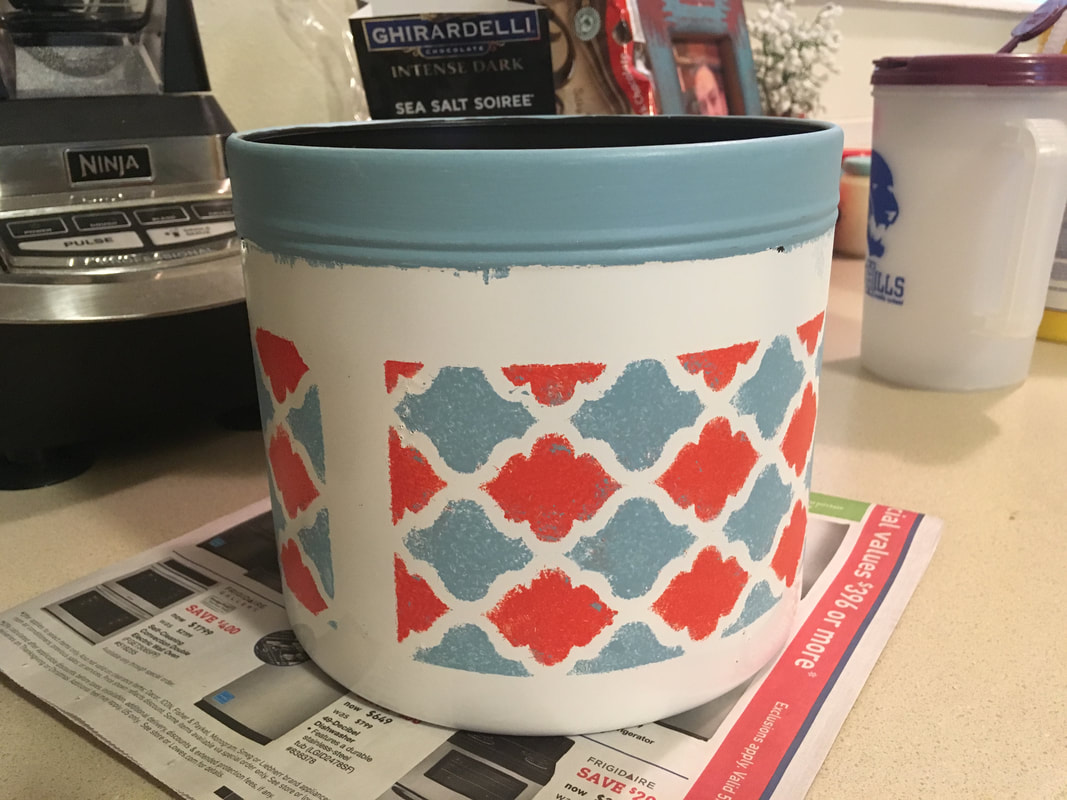
New, super easy craft! The design for this Utensil holder was inspired by my kitchen table. Click here for that tutorial.
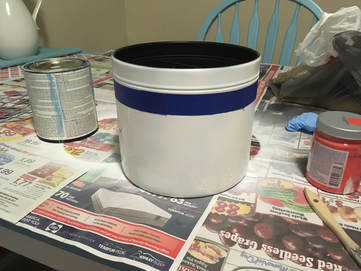
If you aren't aware, this blog is brand new. Today celebrates 2 months since it started! A huge thanks for those who visit my site, you're the reason why I keep blogging. Because the site is so new, I make beginner mistakes. This time, I forgot to take a before picture for this craft! So just imagine this piece with a bronze finish. Which you can kind of see in the photo below. 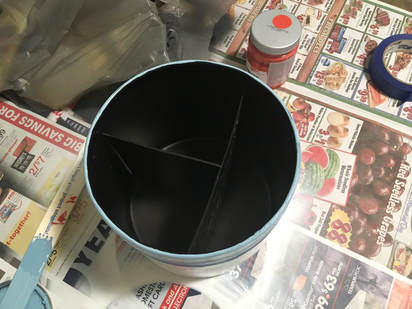
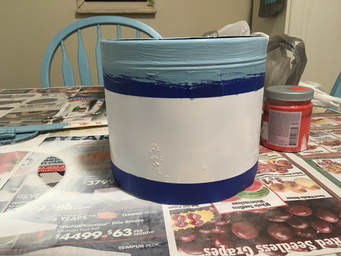
Overall, this was an easy, quick project. I bought this utensil holder before I had settled on my current color scheme for the kitchen. As I have made the transition to my current color scheme, which is red, blue, and white, I wanted this utensil to fit in as well. I decided that the best way to do it was to repaint it.
First, you start by cleaning your piece. That way, the paint will stick onto the utensil holder. I used spray paint for the white base. And did two layers of white. In the photo below, you can tell that one layer isn't good enough.
Once it was completely dry, I put painter's tape around the bottom and below the rim. I painted the rim first with two layers of paint.
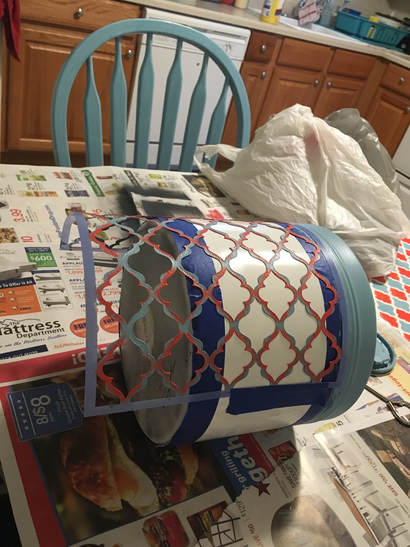
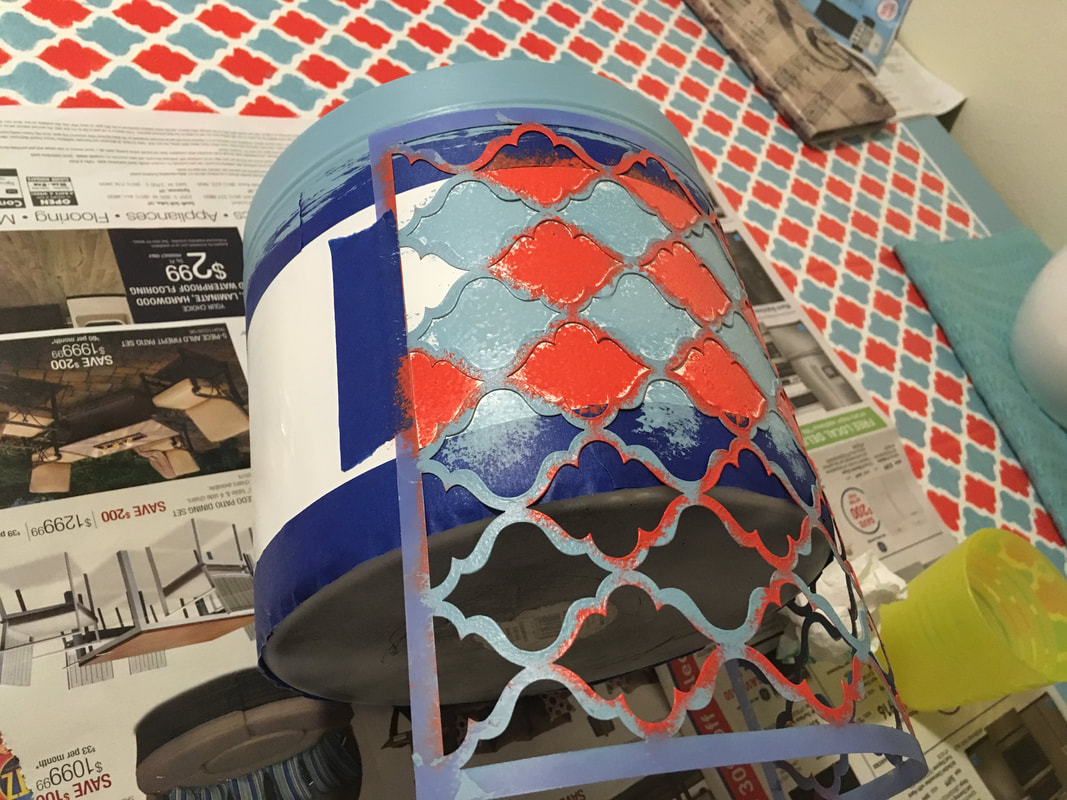
After that, I taped the stencil I used to paint my table onto the Utensil holder and painted around the entire holder.
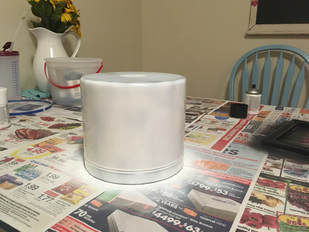
Pretty easy and quick to do. Just a heads up, be careful with the tape, it could peel off what's underneath. Luckily for me, I had a white paint pen to the rescue.
I've seen this done to other appliances such as a kitchen mixer. So don't feel like you have to buy your item a specific color. Thanks for reading. Please like on FB or pin it! |
About Me
Hello! My name is Char. Thank you for visiting my blog, CallCrafts. I am a wife and mother who LOVES to make things. Read tutorials on crafts I've created to decorate my home, for parties, and more! Read more about me in My Story.
Categories
All
Archives
April 2018
Popular Posts |